How to Install a Private OpenVPN Server on Ubuntu 22.04 [Step-by-Step]

![How to Install a Private OpenVPN Server on Ubuntu 22.04 [Step-by-Step]](/v3/img/containers/blog_main/cloud_computing.jpg/5982b1adf933064618994915989c8491/cloud_computing.jpg?id=1739046670)


OpenVPN grants the ability to establish secure tunnels through a single UDP or TCP port, employing OpenSSL encryption, authentication, and certification methods. In this tutorial, I’ll guide you through the process of setting up and configuring an OpenVPN server on Ubuntu.
With this guide's help, you can easily establish point-to-point connections with the same security level achieved by private networks. You will also be able to allow private networks to access remote websites safely.
#What is a private OpenVPN server?
Let's start with understanding what a private OpenVPN server is. We can define it as a VPN server that runs on OpenVPN, an open-source software. However, it's private, which means it was set up by organizations for their exclusive use. Even individuals can set them up for their personal use.
The fundamental thing about private OpenVPN servers is that strict controls are in place for accessing them. Only users who have been granted permission and have the proper credentials can use the network.
Another great thing about private OpenVPN servers is that you can significantly customize them. For example, when paired with browser session isolation tools like Multilogin, OpenVPN can help ensure operational anonymity and prevent digital fingerprinting. You can adjust them for security features, network setups, and permissions based on your requirements. This makes them a flexible network security solution for both organizations and individuals looking for secure remote access and control over their private networks.
#Prerequisites
Ensure that your Ubuntu system meets the necessary requirements before proceeding with the configuration of an OpenVPN server.
-
Ubuntu 22.04 system: Make sure that your Ubuntu 22.04 system is operational and accessible. Administrative or root privileges are required here;
-
Terminal access: You can connect directly or use SSH for remote access;
-
Basic command line proficiency: Familiarity with command line operations is necessary to follow the instructions in this article;
-
Understanding of networking concepts: This will help you configure the server correctly. You must specifically comprehend IP addresses, subnets, and firewalls.
Once you have all the requirements, you can continue by following the instructions provided in this article. Not using Ubuntu 22.04? Check our guide on how to install OpenVPN on Ubuntu 24.04
#Install a private OpenVPN server on Ubuntu: Step-by-step
Although installing a private OpenVPN server on Ubuntu involves many steps, you'll find it straightforward as you follow the instructions below. The entire process typically takes less than an hour. I'll cover how to update your system, install the necessary software, configure server and client certificates, and adjust server settings to ensure a secure VPN connection.
#Step 1: System update
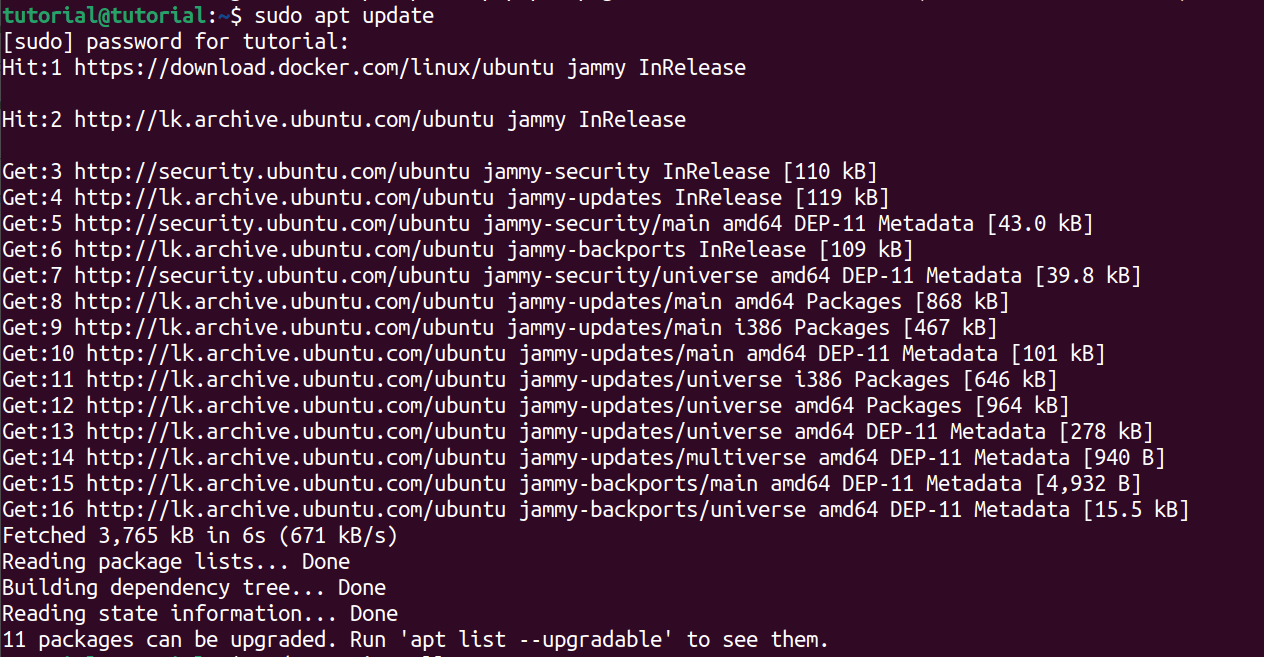
Begin by updating the package list. Performing this step guarantees the installation of the latest software versions and security updates. Run the provided command to update your system's package list.
sudo apt update
Output:
#Step 2: Install OpenVPN and Easy-RSA
OpenVPN is the leading software for establishing and handling VPN connections. Meanwhile, Easy-RSA serves as a utility designed to simplify the generation of essential SSL certificates and keys for secure communication.
You can install these two software by using the commands provided below.
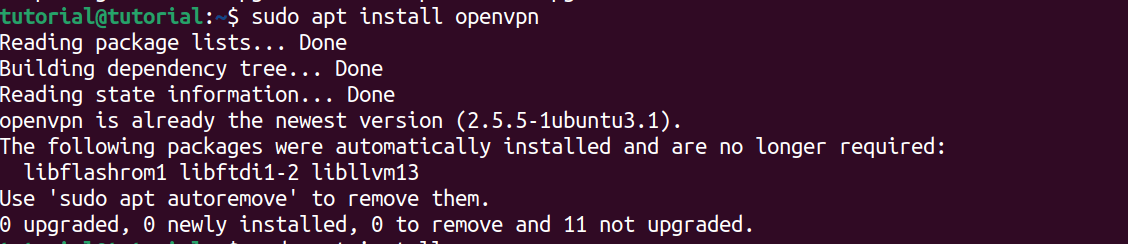
Install the OpenVPN:
sudo apt install openvpn
Output:
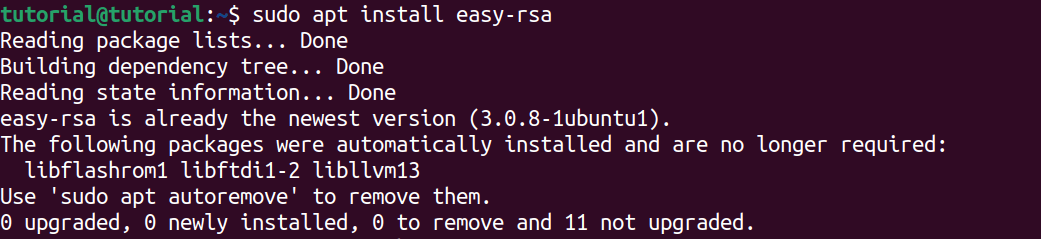
Install the Easy-RSA:
sudo apt install easy-rsa
Output:
#Step 3: Initialize the Easy-RSA PKI
Once Easy-RSA is installed, you have to initialize the Public Key Infrastructure. This step is necessary to set up the certificate authority and generate the certificates and keys needed for OpenVPN.
Initially, copy the Easy-RSA configuration directory to an alternate location. This precaution will safeguard your alterations from being overwritten by future package upgrades.
sudo cp -r /usr/share/easy-rsa /etc/
Output:
![]()
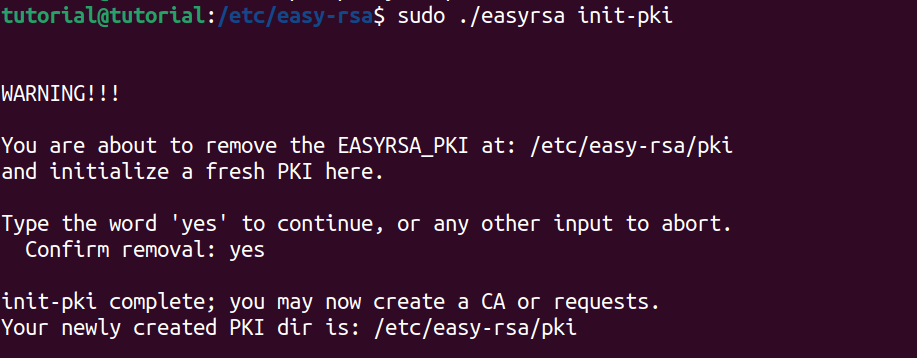
Navigate to the copied directory and initialize the Public Key Infrastructure.
cd /etc/easy-rsa/
![]()
sudo ./easyrsa init-pki
Output:
#Step 4: Generate the certificate authority
In this step, you will generate the Certificate Authority certificate and key.
sudo ./easyrsa build-ca
Output:
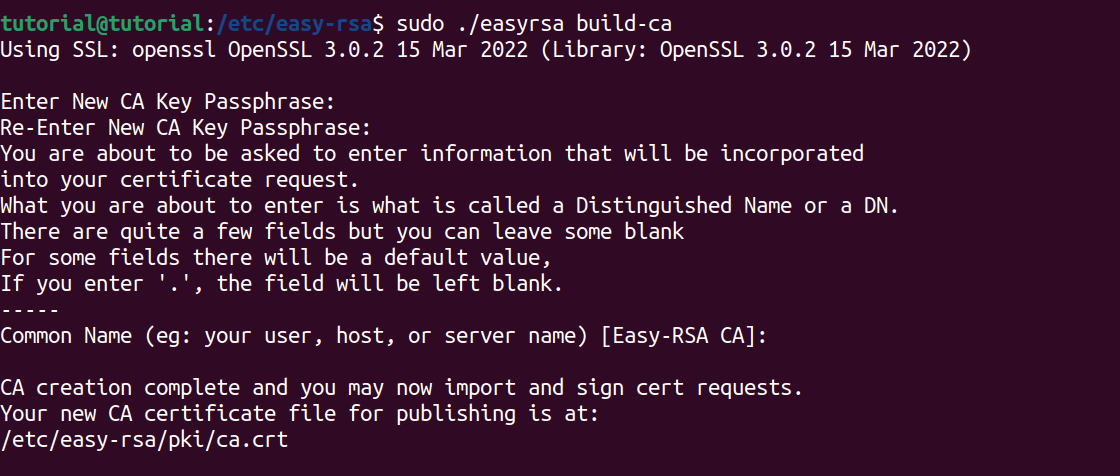
Here you'll be prompted to enter a password and a common name for the Certificate Authority key for security. The CA key should be kept secure as it signs certificates for your VPN.
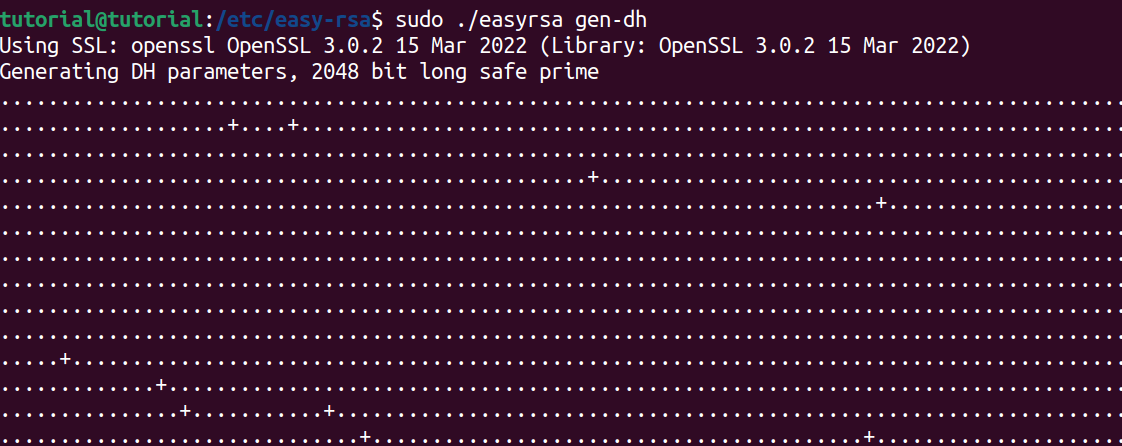
#Step 5: Generate Diffie-Hellman parameters
With Diffie-Hellman keys, you can establish secure connections with strong encryption. However, It is possible to skip this step entirely, but you would leave your VPN setup less secure.
sudo ./easyrsa gen-dh
Output:
#Step 6: Generate OpenVPN server certificate and key
In this step, you generate the server certificate and key for your OpenVPN server.
Here, you first have to change the current working directory to the Easy-RSA directory.
cd /etc/easy-rsa
![]()
Feel free to exchange "server" with a different server name in the provided code. This name will be used for client connections to identify the server.
sudo ./easyrsa build-server-full server nopass
Output:
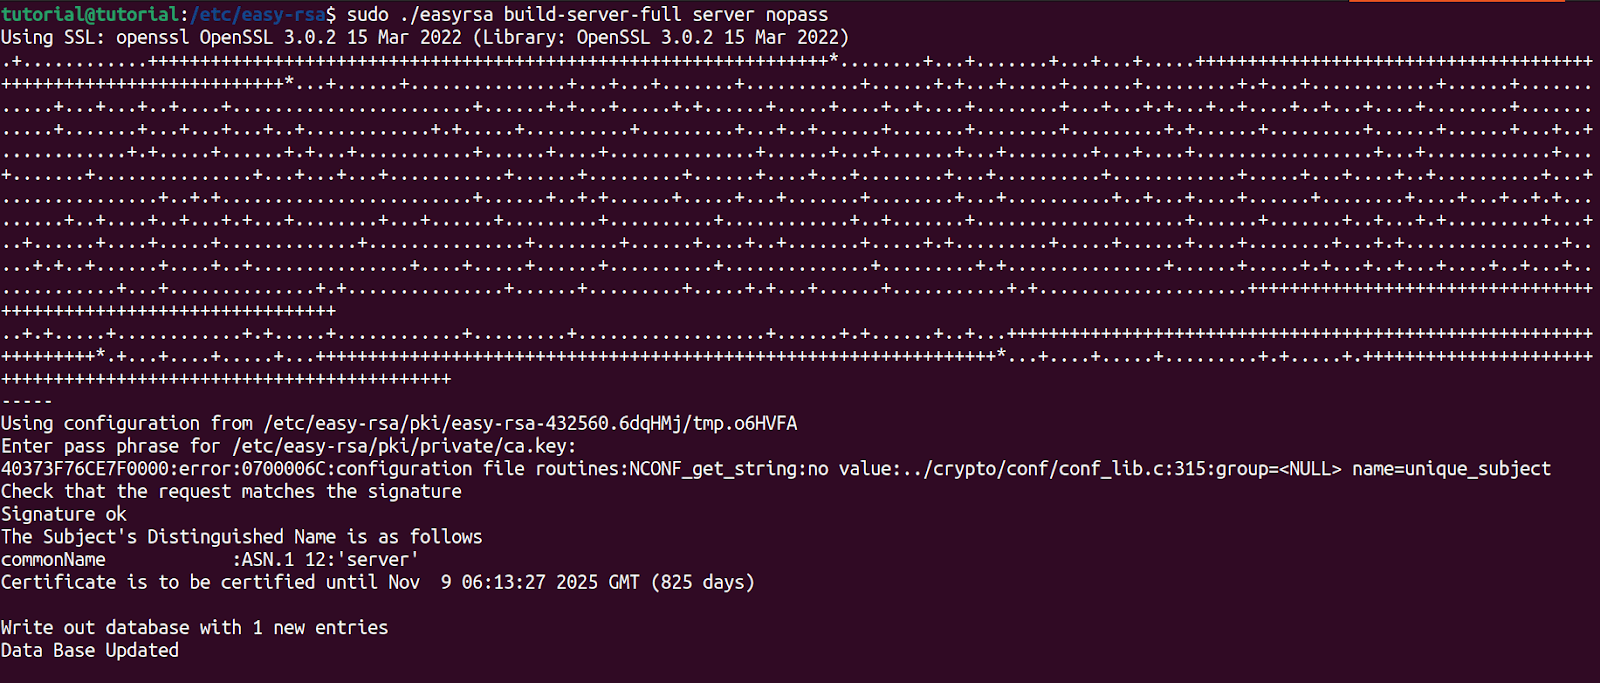
The nopass flag disables passphrase protection.
#Step 7: Generate HMAC key
The TLS/SSL pre-shared authentication key adds an extra layer of security by including an HMAC signature on every SSL/TLS handshake packet. This measure helps prevent potential DoS attacks and UDP port flooding. Although not mandatory, I strongly advise you to consider this step, particularly if you intend to safeguard against specific attacks.
sudo openvpn --genkey secret /etc/easy-rsa/pki/ta.key
![]()
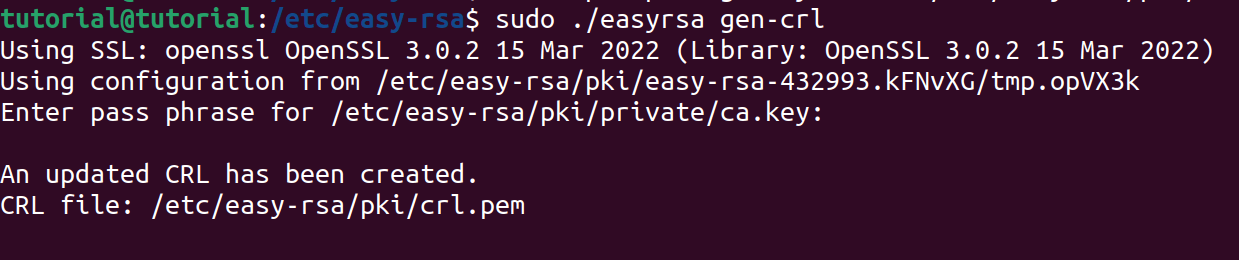
#Step 8: Generate OpenVPN revocation certificate
Generate a revocation certificate to invalidate previously signed certificates.
sudo ./easyrsa gen-crl
Output:
#Step 9: Copy server certificates and keys
In this step, copy the generated server certificates and keys to the OpenVPN server's configuration directory. These files are necessary for establishing secure connections between the server and clients.
sudo cp -rp /etc/easy-rsa/pki/{ca.crt,dh.pem,ta.key,crl.pem,issued,private} /etc/openvpn/server/
Output:

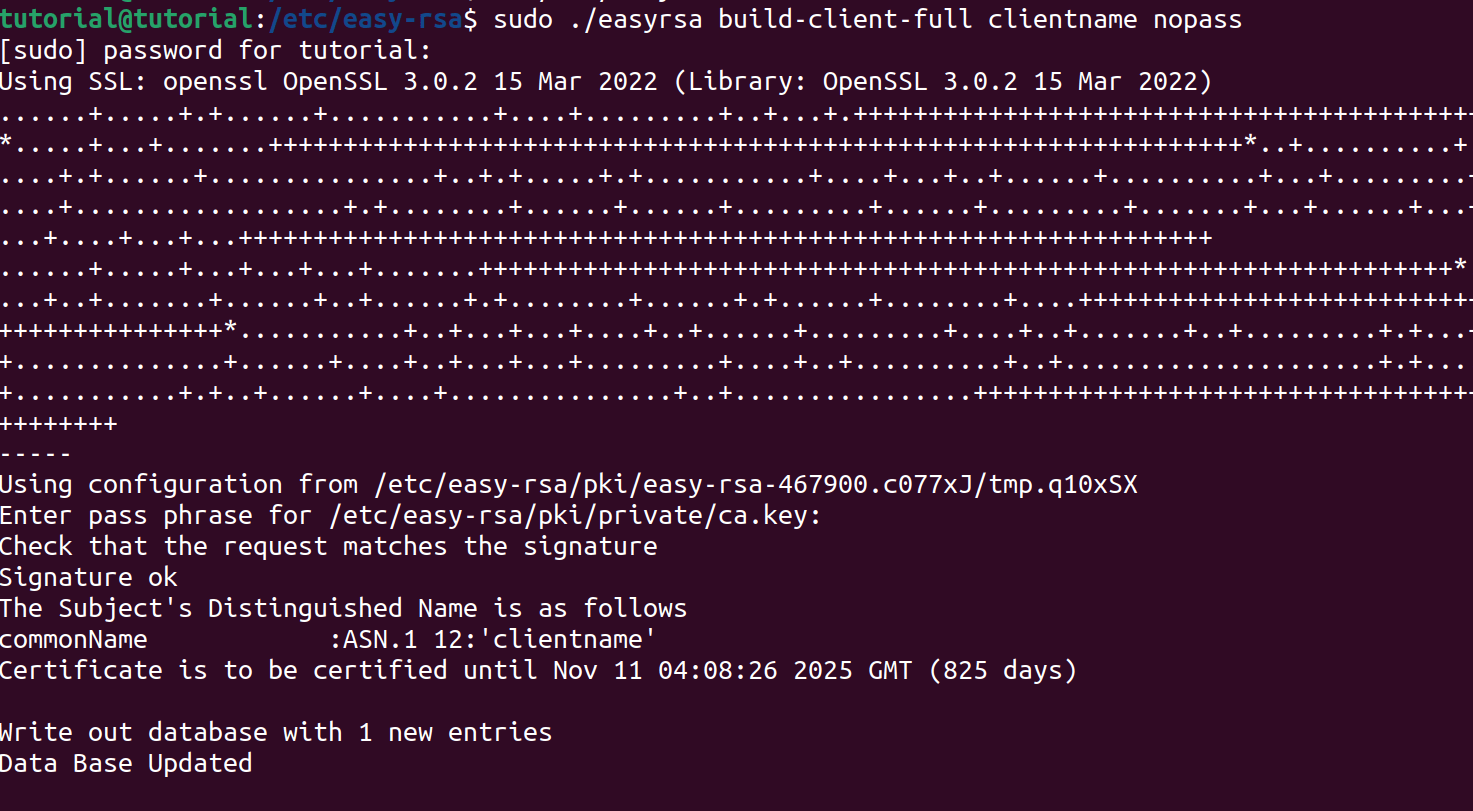
#Step 10: Generate OpenVPN client certificates and keys
This step involves creating certificates and keys for each client that will connect to the OpenVPN server. These certificates and keys are unique to each client and are used for authentication. Use the client's actual name instead of "clientname" in the code below.
cd /etc/easy-rsa
![]()
sudo ./easyrsa build-client-full clientname nopass
Output:
#Step 11: Create client directories and copy files
Create directories for each client and copy their certificates and keys. Change "clientname" to the real name of the client you are configuring. Every client must have their own directory. Organizing client-specific directories ensures that each client has a designated place to store their credentials. This separation increases security and simplifies management.
sudo mkdir /etc/openvpn/client/clientname
![]()
After that, specific client_related files must be copied to your client's directory.
sudo cp -rp /etc/easy-rsa/pki/{ca.crt,issued/clientname.crt,private/clientname.key} /etc/openvpn/client/clientname/

#Step 12: Configure OpenVPN server
Here, you're copying a sample server configuration file to the OpenVPN server configuration directory. This file contains settings that control how the OpenVPN server operates.
sudo cp /usr/share/doc/openvpn/examples/sample-config-files/server.conf /etc/openvpn/server/

#Step 13: Edit the server configuration file
To modify the server configuration, you'll need to utilize a text editor such as nano. The included configuration file offers several adjustable parameters that cater to your preferences. These parameters oversee various aspects, like the server's listening port, tunnel device type, encryption preferences, and more.
sudo nano /etc/openvpn/server/server.conf
![]()
Enter following instructions:
port 1194
proto udp4
dev tun
ca ca.crt
cert issued/server.crt
key private/server.key # This file should be kept secret
dh dh.pem
topology subnet
server 172.16.20.0 255.255.255.0
ifconfig-pool-persist /var/log/openvpn/ipp.txt
push "redirect-gateway def1 bypass-dhcp"
push "dhcp-option DNS 208.67.222.222"
push "dhcp-option DNS 208.67.220.220"
client-to-client
keepalive 10 120
tls-auth ta.key 0 # This file is secret
cipher AES-256-CBC
persist-key
persist-tun
status /var/log/openvpn/openvpn-status.log
log-append /var/log/openvpn/openvpn.log
verb 3
explicit-exit-notify 1
auth SHA512
Modify the file based on your preferences. Refer to the explanations below:
-
port 1194: The port on which OpenVPN will listen for incoming connections.
-
proto udp4: Specifies the use of UDP as the transport protocol for communication.
-
dev tun: Defines the type of tunnel network device to be used.
-
ca ca.crt: Specifies the Certificate Authority certificate file to verify the authenticity of remote peers.
-
cert issued/server.crt: The server's certificate file is used for authentication.
-
key private/server.key: The server's private key file, which must be kept confidential.
-
dh dh.pem: The Diffie-Hellman parameters file used for key exchange.
-
topology subnet: Sets the topology to the subnet, allowing OpenVPN to route traffic between clients.
-
server 172.16.20.0 255.255.255.0: Defines the server's virtual IP address pool and subnet mask.
-
ifconfig-pool-persist /var/log/openvpn/ipp.txt: Stores persistent IP assignments in the specified file.
-
push "redirect-gateway def1 bypass-dhcp": Redirects the client's default gateway through the VPN tunnel.
-
push "dhcp-option DNS 208.67.222.222" and push "dhcp-option DNS 208.67.220.220": Configures DNS servers for clients.
-
client-to-client: Allows communication between clients connected to the same OpenVPN server.
-
keepalive 10 120: Sets a 10-second interval for ping/keepalive messages.
-
tls-auth ta.key 0: Utilizes a secret TLS authentication key for added security.
-
cipher AES-256-CBC: Specifies the encryption cipher for data transmission.
-
persist-key and persist-tun: Ensures that OpenVPN's encryption keys and tunnel network device settings persist across restarts.
-
status /var/log/openvpn/openvpn-status.log: Specifies the file to store runtime status information.
-
log-append /var/log/openvpn/openvpn.log: Appends log output to the specified log file.
-
verb 3: Sets the verbosity level of OpenVPN's logging.
-
explicit-exit-notify 1: Informs clients to explicitly send an exit notification when disconnecting.
-
auth SHA512: Specifies the message digest algorithm for data integrity.
The file looks like this:
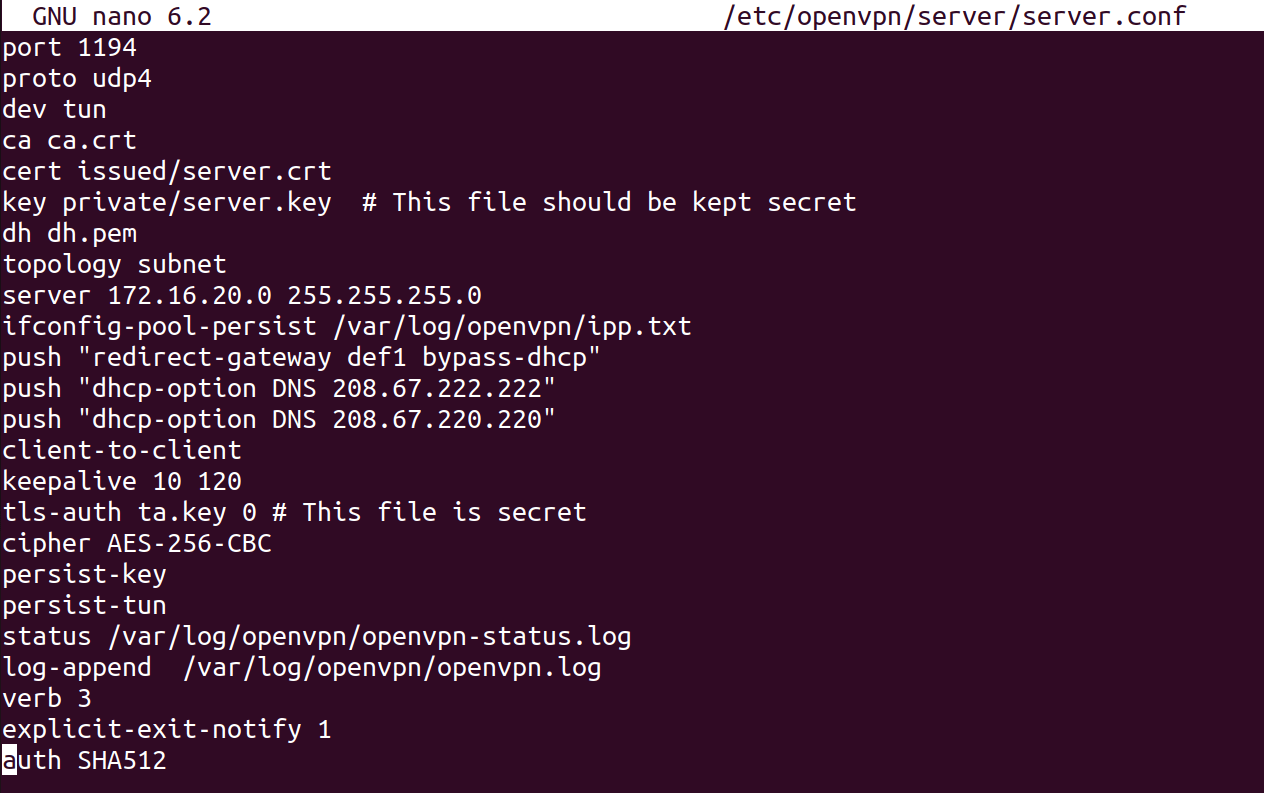
This configuration sets up an OpenVPN server using UDP on port 1194 with various security measures, network settings, and logging options. It's configured to route all client traffic through the VPN and uses encryption for secure communication.
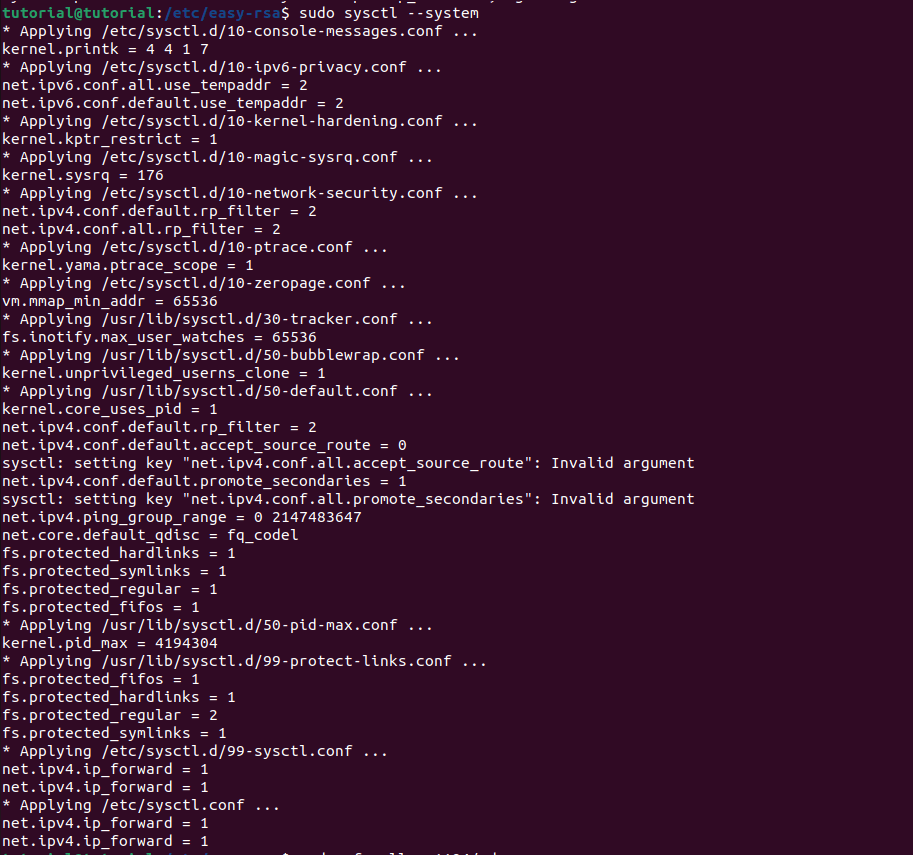
#Step 14: Enable IP forwarding and configure the firewall
Enable IP forwarding in the sysctl configuration. This step allows the server to route traffic between its interfaces. It's an important step for proper VPN operation.
sudo sed -i 's/#net.ipv4.ip_forward=1/net.ipv4.ip_forward=1/' /etc/sysctl.conf

Apply the changes without rebooting the server.
sudo sysctl --system
You should also configure the firewall to allow traffic on UDP port 1194, which is the default port used by OpenVPN.
sudo ufw allow 1194/udp

If desired, you can restrict connections to specific sources.
#Step 15: Configure IP masquerading
IP masquerading is a technique used to route traffic from one network to another. In this step, you're updating the Uncomplicated Firewall rules and policies to ensure that masquerading works properly.
First, you need to identify your default network interface. The below command is used to determine the default network interface. It helps identify the network interface through which traffic will be routed.
ip route get 8.8.8.8
Output:

Next, we need to update UFW rules. UFW is a user-friendly interface for managing iptables, Ubuntu's default firewall management tool. The command below opens the UFW configuration file for editing.
sudo nano /etc/ufw/before.rules
![]()
Afterward, we need to update the UFW default forwarding policy. This command uses the 'sed' utility to find and replace a line in the UFW configuration. It changes the default forwarding policy from drop to accept.
sudo sed -i 's/DEFAULT_FORWARD_POLICY="DROP"/DEFAULT_FORWARD_POLICY="ACCEPT"/' /etc/default/ufw

After making changes to the firewall rules, you need to reload UFW for the changes to take effect. This ensures that the updated rules are applied without requiring a server restart.
sudo ufw reload

If you encounter any errors, try the command sudo sed -ie 's/ENABLED=no/ENABLED=yes/' /etc/ufw/ufw.conf and then type the reload command.
#Step 16: Start the OpenVPN server
Enable and start the OpenVPN server service.
sudo systemctl enable --now openvpn-server@server
![]()
Next, check the service status. The command below will provide information on its current state and recent log messages.
sudo systemctl status openvpn-server@server
Output:
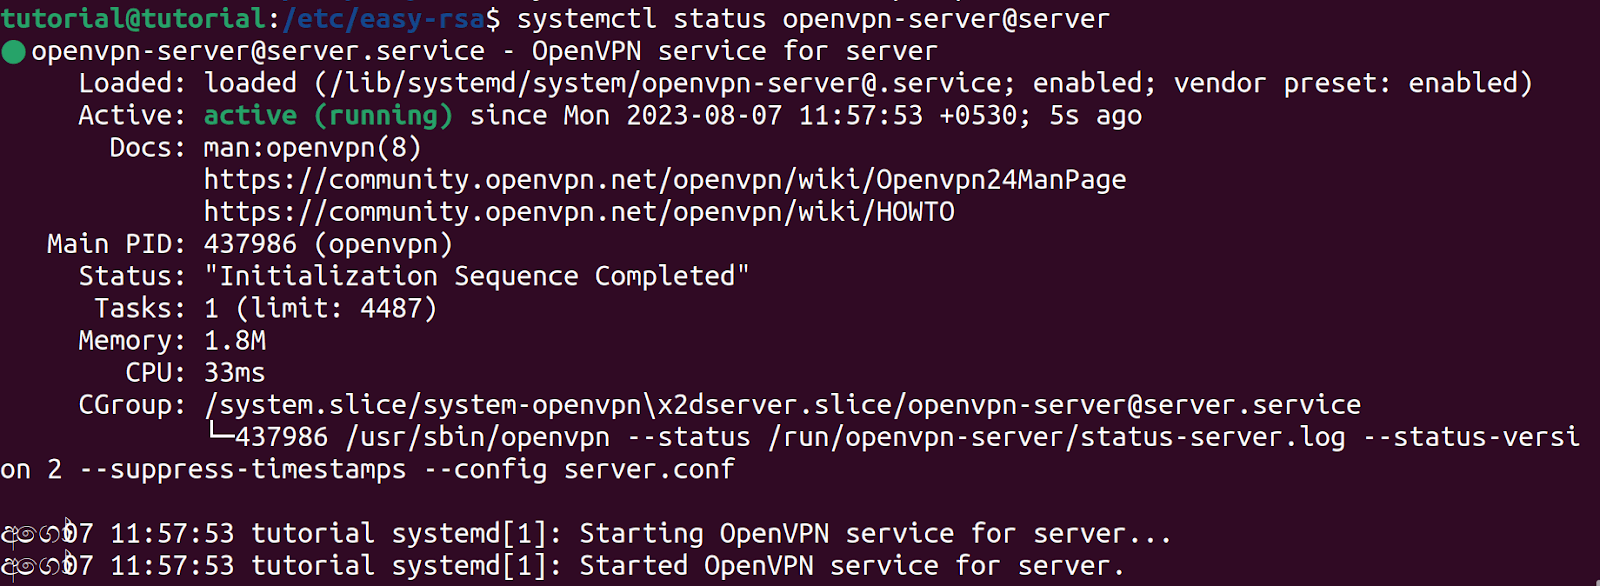
Congratulations! Your OpenVPN server is now set up on Ubuntu 22.04. Remember to configure your clients according to your setup.
#Conclusion
You can now browse securely with OpenVPN. Although this guide has equipped you with the essential procedures for setting up an OpenVPN server, there are further precautions to guarantee the continuous security of your VPN. It is necessary to maintain certifications, monitor logs regularly, and consistently update your server to safeguard the security of your OpenVPN server.