How to Install NPM on Ubuntu 24.04 (3 Methods)


NPM is installed alongside Node.js and is essential for managing JavaScript dependencies in a development environment. This guide covers installing NPM on Ubuntu 24.04 using multiple approaches, including package managers and manual installation. Each method is suited for different development scenarios, ensuring flexibility in setup.
#Prerequisites
Before beginning, ensure you have the following:
-
A running instance of Ubuntu 24.04 server
-
SSH access to the server (with root or sudo user privileges).
#What is NPM used for?
-
NPM serves multiple roles in JavaScript and Node.js development, primarily handling package installation, dependency management, script execution, and package publishing. It provides a central registry for third-party libraries, allowing developers to install tools and frameworks with a single command. Running
npm install expressretrieves Express.js and its dependencies, reducing the effort required to configure external libraries. -
Dependency management has another critical function. The
package.jsonfile records installed libraries and their versions, ensuring consistency across development environments. Runningnpm installin a project directory restores all dependencies, making onboarding and deployment more efficient. Lock files likepackage-lock.jsonalso guarantee version stability, preventing unintended updates from breaking applications. -
Beyond dependency handling, NPM automates development tasks through scripts defined in
package.json. Runningnpm startcan trigger commands likenode app.js, whilenpm testexecutes a predefined testing workflow. This approach centralizes command execution, reducing manual setup overhead. -
Publishing packages to the NPM registry allows developers to share reusable JavaScript libraries. A package can be published using
npm publish, making it accessible to others through a simple installation command. This fosters code reuse and collaboration across projects. -
Updating and removing dependencies done with commands like
npm updateandnpm uninstall, which ensures projects stay current and maintainable. Version constraints inpackage.jsonallow controlled updates, preventing compatibility issues while keeping libraries up to date.
#How to install NPM on Ubuntu 24.04
To install NPM on Ubuntu 24.04, Node.js must be set up. This guide explores three installation methods: using Ubuntu's default repository, the NodeSource repository, and the Node Version Manager (NVM). Each approach is suited to different use cases, such as stability, access to the latest features, or managing multiple Node.js versions.
Deploy and scale your projects with Cherry Servers' cost-effective dedicated or virtual servers. Enjoy seamless scaling, pay-as-you-go pricing, and 24/7 expert support—all within a hassle-free cloud environment.
#Step 1: Updating the system
Begin by updating your system to ensure all existing packages are current. This minimizes potential conflicts during the installation process.
Run the following commands to update the package lists and upgrade installed packages:
sudo apt update
sudo apt upgrade -y
This process fetches the latest package information and applies updates to all installed software.
#Step 2: Installing Node.js and NPM
Installing Node.js also provides NPM, the package manager for JavaScript libraries. The installation method affects version availability and system compatibility.
#Option 1: Installing from Ubuntu’s default repository
Ubuntu’s package repository offers a straightforward way to install Node.js and NPM while ensuring security updates through system maintenance. The available version may not be the latest release.
1. To install both packages, run the command:
sudo apt install -y nodejs npm
The -y flag confirms the installation automatically. This command retrieves and installs the Node.js runtime and NPM.
2. Verify the installation to confirm that Node.js and NPM were installed successfully:
nodejs -v
npm -v

This method suits developers who prioritize stability and integration with Ubuntu’s package manager. For the latest Node.js version, use the NodeSource repository or Node Version Manager (NVM).
#Option 2: Installing Node.js via NodeSource repository
The NodeSource repository provides an updated and reliable method for installing the latest stable version of Node.js on Ubuntu 24.04. The default Ubuntu repository often falls behind in version updates, which can limit access to new features and security patches.
NodeSource ensures direct access to maintained releases, making it the preferred choice for developers who need a current and well-supported Node.js environment.
1. Before installing Node.js, update your package list to ensure you are fetching the latest metadata from available sources:
sudo apt update
2. Now, add the NodeSource repository for Node.js 20.x (or modify the version number to install a different release):
curl -fsSL https://deb.nodesource.com/setup_20.x | sudo -E bash -
This command downloads and executes the NodeSource setup script, configuring the repository and preparing your system for installation.

3. Once the repository is added, install Node.js and NPM by running:
sudo apt install -y nodejs
This command fetches Node.js along with its bundled NPM package. To confirm that the installation was successful, check the installed versions:
node -v
npm -v
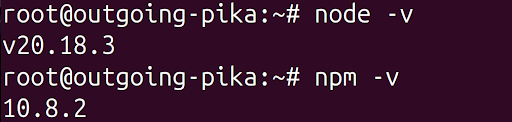
These commands should return version numbers, indicating that Node.js and NPM are correctly installed and ready to use.
#Managing Node.js versions
The NodeSource repository provides a single version of Node.js at a time. If you need to switch between different versions, consider using Node Version Manager (NVM). Otherwise, updating Node.js via NodeSource is straightforward:
sudo apt update && sudo apt upgrade -y
Installing Node.js via the NodeSource repository ensures access to the latest stable version with frequent updates. This method is ideal for developers requiring newer features, security patches, and performance improvements.
NVM might be a better alternative for managing multiple versions, but for most users, NodeSource provides a reliable and straightforward installation process.
#Option 3: Installing via NVM (Node Version Manager)
NVM (Node Version Manager) handles multiple Node.js versions without altering system-wide configurations. It allows seamless switching between versions, ensuring projects use the correct Node.js release without dependency conflicts.
1. To install NVM, download and execute the official installation script:
curl -o- https://raw.githubusercontent.com/nvm-sh/nvm/v0.39.4/install.sh | bash
It downloads the latest installation script, clones the NVM repository into the user's home directory, and modifies shell configuration files to load NVM automatically.
2. After installation, the NVM script must be loaded into the current shell session:
export NVM_DIR="$HOME/.nvm"
[ -s "$NVM_DIR/nvm.sh" ] && \. "$NVM_DIR/nvm.sh"  # This loads nvm
[ -s "$NVM_DIR/bash_completion" ] && \. "$NVM_DIR/bash_completion"
3. Now, restart the terminal or manually source the profile file:
source ~/.bashrc  # Bash
source ~/.zshrc   # Zsh
4. With NVM installed, install Node.js using:
nvm install node # Installs the latest stable release
To install a specific version:
nvm install 18.17.1
nvm install 23.7.0
nvm install 22.0.0
5. List all installed versions with:
nvm list
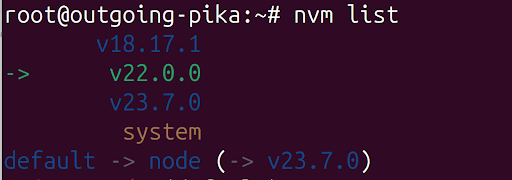
6. To switch between installed versions:
nvm use 23.7.0
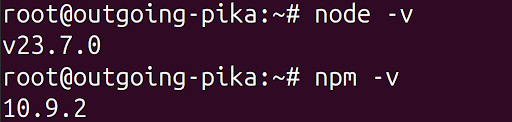
7. After installing a Node.js version, confirm that it is active by checking the installed versions:
node -v
npm -v
8. You can now optionally set a default version for all new terminal sessions:
nvm alias default 18.17.1

These commands return the installed Node.js and NPM versions managed by NVM.
#When to use NVM?
NVM is the preferred method for developers managing multiple projects requiring different Node.js versions. Since it isolates Node.js installations per user, it avoids conflicts with system-wide packages. This flexibility makes NVM essential for development environments where maintaining compatibility across projects is necessary.
#Conclusion
This guide covered the installation of NPM on Ubuntu 24.04 using three methods: Ubuntu’s default repository, the NodeSource repository, and NVM. Each method caters to different development needs, from stability to version flexibility. After installation, we verified the setup and learned basic package management tasks.
With NPM installed, you are now equipped to manage JavaScript dependencies efficiently. Explore NPM’s documentation for advanced usage to leverage its full potential in your projects.