How to Install a GUI on Ubuntu Server: Step-by-Step Guide

Ubuntu Server is primarily designed to run without a graphical interface, making it lightweight and optimized for server use. However, there are situations where a GUI can simplify system management, especially for users unfamiliar with the command line. In this tutorial, I’ll guide you through the process of installing a GUI on Ubuntu Server.
#Prerequisites
Before proceeding with the installation, ensure that you have the following:
- The latest Ubuntu Server installed.
- A user account with
sudoprivileges. - An active internet connection.
Deploy and scale your projects with Cherry Servers' cost-effective dedicated or virtual servers. Enjoy seamless scaling, pay-as-you-go pricing, and 24/7 expert support—all within a hassle-free cloud environment.
#Installing a graphical user interface (GUI) on the Ubuntu server
#Step 1: Update your system
Before installing any software, it's essential to ensure your system is up-to-date. Run the following commands to update your package lists and upgrade any outdated packages:
sudo apt update
sudo apt upgrade -y
This ensures that you have the latest security patches and system updates installed.
#Step 2: Choose a desktop environment
Ubuntu offers various desktop environments to suit different needs and performance preferences. Here are some popular ones:
- GNOME: The default desktop environment for Ubuntu Desktop.
- Xfce (Xubuntu): Lightweight and resource-efficient.
- LXDE (Lubuntu): Extremely lightweight, ideal for low-spec hardware.
- KDE (Kubuntu): A feature-rich environment that might use more resources.
For this tutorial, we’ll focus on installing GNOME and Xfce, but you can choose any of the others by replacing the package name in the following steps.
Also read: How to check your Ubuntu version
#Step 3: Install the desktop environment
#Installing GNOME
If you prefer the full Ubuntu Desktop experience, you can install the GNOME desktop environment. Run the following command:
sudo apt install ubuntu-desktop -y
This will install the full GNOME desktop, along with all its associated applications, which can be resource-heavy.
#Installing Xfce
If you need a more lightweight option, Xfce is an excellent choice. To install it, run:
sudo apt install xubuntu-core -y
This installs the Xfce desktop environment without unnecessary applications, making it a more minimal and efficient choice for servers.
#Installing other desktops
You can install other desktop environments like LXDE or KDE by running:
# For LXDE
sudo apt install lubuntu-core -y


# For KDE Plasma
sudo apt install kubuntu-desktop -y
#Step 4: Install a display manager
A display manager is responsible for starting the desktop environment. Ubuntu uses GDM (GNOME Display Manager) by default for GNOME, but you can install others like LightDM for a lightweight option, especially if you're using Xfce or LXDE.
To install LightDM, run:
sudo apt install lightdm -y
During the installation, you’ll be prompted to select a default display manager. If you’re unsure, LightDM is a good choice, especially for lightweight environments like Xfce.
#Step 5: Enable GUI to start automatically
Once the installation is complete, you’ll need to configure your system to boot into the GUI automatically.
First, check the system’s default target, which determines what services start when the system boots:
systemctl get-default
By default, it should return multi-user.target, which is the non-graphical mode. To switch to graphical mode, run:
sudo systemctl set-default graphical.target
Now, your server will boot into the graphical interface automatically on the next startup.
Also read: How to install NPM on Ubuntu 24.04
#Step 6: Reboot the system
Once you’ve installed the desktop environment and configured it to start automatically, reboot your system to apply the changes:
sudo reboot
After the reboot, you should be greeted by the login screen of the desktop environment you installed (GNOME, Xfce, etc.).
#Step 7: Connect to the GUI (Optional)
If you’re managing your server remotely, you may want to use a remote desktop connection to access the GUI. Here are some popular options:
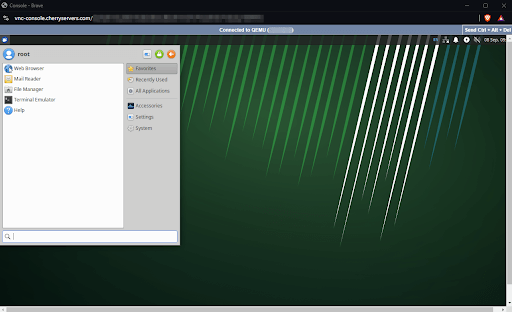
Cloud console: Your cloud provider probably already has a console feature allowing you to connect to your server. If you are using Cherry Servers, select your VM in the client portal and click on Console to access your server console.
You can then log in via the GUI and access your desktop:

VNC: A popular choice for remote desktop connections. To install a VNC server, run:
sudo apt install tightvncserver -y
RDP (Remote Desktop Protocol): RDP is a Microsoft protocol for remote connections, which can be used with Ubuntu. To install an RDP server, run:
sudo apt install xrdp -y
After installing your preferred remote desktop server, configure it according to your needs and connect using your local machine.
You might need to configure your firewall to allow access to your VNC or RDP server.
Also read: How to Install Xrdp on Ubuntu 24.04
#Step 8: Managing the GUI
If you ever want to return to a non-graphical environment, you can change the default target back to multi-user.target:
sudo systemctl set-default multi-user.target
This will ensure that your server boots into the command-line interface (CLI) by default.
#Conclusion
In this tutorial, we have covered how to install a GUI on Ubuntu Server, This can simplify tasks for users who prefer a graphical interface. Whether you choose the feature-rich GNOME or the lightweight Xfce, you now know how to install, configure, and manage a GUI on your server. Please note that using a GUI consumes more system resources and can have performance impacts, especially on production servers.
Starting at just $3.24 / month, get virtual servers with top-tier performance.


