How to Install Docker Compose on Ubuntu 24.04 [Step-by-Step]
![How to Install Docker Compose on Ubuntu 24.04 [Step-by-Step]](/v3/img/containers/blog_main/docker.jpg/760bd6b92773a18fcc1d6c0a7ffe7236/docker.jpg?id=1739046670)
In this tutorial, you will learn how to install Docker Compose on Ubuntu 24.04. In addition, you will see how you can leverage Docker Compose to create multiple applications running in separate containers.
#What is Docker?
Docker is an open-source containerization platform that lets you seamlessly build, share, deploy, and orchestrate applications anywhere - be it on Linux, Windows, Mac or any other computing environment.
#What is Docker Compose?
Built on top of Docker Engine, Docker Compose is a tool for defining and running multi-container applications.
#What does Docker Compose do?
Docker Compose creates containers and other resources defined within the Compose file written in YAML format. With the compose file in place, you can create and launch your multi-container application using the docker compose up command, as we shall see later.
#How to use Docker Compose?
Docker Compose is used for providing simplified control when managing multi-container applications. It simplifies the complexities involved in running multiple containers with interlinked services. In addition, it also makes it easier to collect logs and debug issues in multiple containers compared to Docker.
Ready to supercharge your Docker infrastructure? Scale effortlessly and enjoy flexible storage with Cherry Servers bare metal or virtual servers. Eliminate infrastructure headaches with free 24/7 technical support, pay-as-you-go pricing, and global availability.
#Prerequisites
Before you set sail, ensure you have the following in place:
-
An instance of Ubuntu 24.04 with SSH access;
-
A sudo user configured on the server;
-
Docker installed on your Linux instance. Check out our guide on how to install Docker on Ubuntu 22.04. or how to install Docker on Ubuntu 24.04 if you are using Ubuntu 24.04.
#How to install Docker Compose on Ubuntu 24.04
The below five steps will show you how to install Docker Compose on Ubuntu 24.04. I’ve included how to update package lists, install Docker Compose, deploy LAMP stack using Docker Compose, run Docker Compose, and learn how to pause, stop, and remove containers.
#Step 1: Update Package Lists
First, log into your server and update the package lists as follows.
sudo apt update
This command downloads and updates package information defined in the /etc/apt/sources.list file and /etc/apt/source.list.d directory.
#Step 2: Install Docker Compose
Docker Compose is hosted on Ubuntu repositories and can easily be installed by running the command:
sudo apt install docker-compose-plugin -y
However, the version installed from the repositories does not give you the latest version of Docker Compose. To get the most updated version of Docker Compose, download it from its official GitHub repository. Currently, the latest release is Docker Compose 2.2.27.
Before downloading the latest Docker Compose plugin binary, create a cli-plugins directory in your home folder.
$ mkdir -p ~/.docker/cli-plugins/
Next, download the Docker compose plugin file to the ~/.docker/cli-plugins/ directory using the curl command as shown.
curl -SL https://github.com/docker/compose/releases/download/v2.2.27/docker-compose-linux-x86_64 -o ~/.docker/cli-plugins/docker-compose
Run the ls command to verify the presence of the docker-compose file.
ls -lh ~/.docker/cli-plugins
Next, assign execute permissions to the file using the chmod command.
chmod +x ~/.docker/cli-plugins/docker-compose
To confirm the installation was successful, check the Docker compose version.
docker compose version
#Step 3: Deploy LAMP stack using Docker Compose
With Docker Compose already installed, we will test it by deploying a LAMP stack application. LAMP ( Linux Apache Mysql PHP ) is a popular web hosting stack used to host websites.
To get started, create the project directory and navigate into it. In this case, our project directory is my-demo-app.
mkdir ~/my-demo-app

cd ~/my-demo-app
Next, create a docker-compose.yml file.
$ nano docker-compose.yml
Add the following lines of code:
version: '2'

services:
  apache:
    image: php:apache
    container_name: apache-app
    ports:
      - "8080:80"
    volumes:
      - ./src:/var/www/html
    depends_on:
      - mysql
    links:
      - mysql


  mysql:
    image: mysql:8.0
    container_name: mysql-app
    restart: always
    environment:
      MYSQL_ROOT_PASSWORD: mysql_root_password
      MYSQL_DATABASE: mydatabase
      MYSQL_USER: myuser
      MYSQL_PASSWORD: myuser_password
    ports:
      - "3306:3306"
    volumes:
      - ./mysql-data:/var/lib/mysql
The configuration above sets up two services:
apache: This is the Apache web service with PHP support. It runs as a container called apache-app created from the php:apache image. The webserver will serve files from the .src directory which will be created in the project folder. The webserver will run on port 80 on the container which will be mapped on port 8080 on the host system.
mysql: This is the MySQL database service with a specified root password, database name, MySQL username, and password. The service runs as a container called mysql-app on port 3306 which is mapped on port 3306 on the host system.
Save the changes in the YAML file and exit.
#Step 4: Run Docker compose
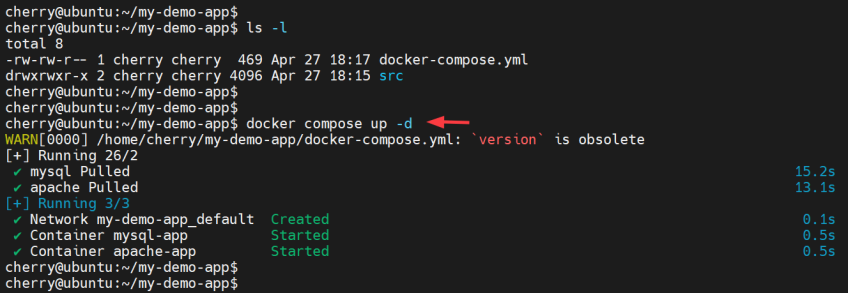
Having defined the services to be created, the next step is to start the LAMP stack using Docker Compose. To do so, run the following docker compose command.
$ docker compose up -d
The command downloads the specified Docker images, in this case php:apache and mysql:8.0. Afterward, it creates the mysql-app and apache-app containers and runs them in detached mode using the -d flag. Additionally, it creates a default network for communication between the services, the mysql-data persistent directory for the database, and the src web directory for storing website files.
To verify currently running containers, run the docker ps command:
docker ps
You will get the following output showing all running containers and their details such as status and network ports.
You can also list the existing images as shown.
docker images
You can check the logs generated by the running containers using the docker compose logs command.
docker compose logs
At this point, we will create a simple webpage to test the web server. So, navigate to the web directory called src, which is located in the project folder.
cd src
Create an index.html file.
nano index.html
Here’s some sample code you can use to define the welcome page.
<!DOCTYPE html>
<html>
<body>
     <h1>LAMP stack successfully deployed using Docker compose!</h1>
</body>
</html>
Save the changes and exit the file. Launch your browser and head over to the server’s URL as shown:
http://server-ip:8080
You should get the webpage below, proof that the webserver is running as expected.
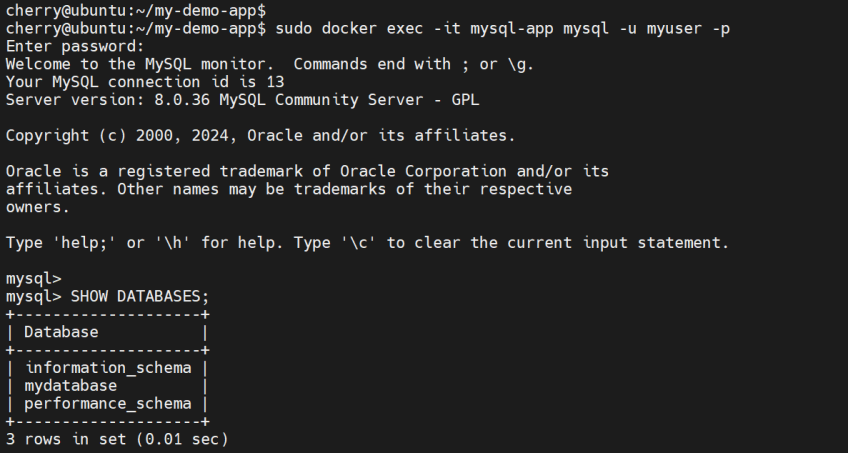
To connect to the mysql-app database container using the MySQL user specified in the YAML file, run the command:
sudo docker exec -it mysql-app mysql -u myuser -p
Provide the user’s password and hit ENTER to access the MySQL shell as shown.
To exit the shell and the container by extension, type exit and hit ENTER.
#Step 5: Pause, stop, and remove containers
To pause the Docker compose environment execution without altering the state of the containers, use the command:
docker compose pause
To resume execution or unpause the environment, run the command:
docker compose unpause
To stop the environment without removing the containers, run:
docker compose stop
To stop and remove containers and the default network created by Docker Compose, run the command:
docker compose down
#Docker Compose Use Cases
-
Multiple container orchestration: Docker Compose lets you define applications with many containers in one YAML file. In a microservices architecture, you can deploy separate services for API, authentication, and data storage using one file. Each container is configured with its own network settings, environment variables, and volume mounts. This approach removes the need for multiple and complex scripts.
-
Consistent development environments: Docker Compose ensures every developer uses the same containerized services. It defines the complete application stack in a YAML file managed by version control. The file includes databases, message brokers, and external services. This simplifies dependency management, communication between services, and persistent storage. In addition, it creates smoother transitions from development to staging and production.
-
Staging environment replication: Docker Compose lets you replicate the exact configuration used in production by enabling you to define all the services (web servers, databases, and etc.) in a single YAML file. A single command such as docker-compose up spins up the entire environment, reducing the time and effort required to build and deploy a complex multi-container application. This speed allows teams to quickly test changes and iterate on features without manual setup each time.
#Conclusion
In this guide, you have learned how to install Docker Compose on Ubuntu 24.04. You have also seen how to start a multi-container application, and stop and delete all the containers and resources associated with the application.
Check out the official documentation for a comprehensive coverage of all the Docker Compose commands.
Starting at just $3.24 / month, get virtual servers with top-tier performance.


