How to Install Ansible on Ubuntu 24.04: Step-by-Step Guide


Ansible is an automation tool for simplifying software deployment and configuration changes in various environments. It includes different modules for tasks like installation, file management, service configuration, etc. The declarative automation scripts, typically called playbooks, enable sysadmins and developers to manage environment configurations and automation on Ansible.
This guide will go through how to install Ansible on Ubuntu 24.04.
#Prerequisites
Before beginning, ensure you have the following:
-
At least two VPS instances running Ubuntu 24.04 operating system. One will act as the Ansible controller node, while the other will be the worker or managed node.
-
SSH access to the VPS (with Root or sudo user privileges).
#What is Ansible?
Ansible is an open-source automation tool for defining, managing, and automating the configuration, deployment, and orchestration of IT infrastructure and applications. It can be used declaratively by defining the desired state of your system in YAML. In doing so, it ensures your system is configured as expected. Unlike other agent-based tools, Ansible is agentless. It uses SSH (for Linux and BSD systems) and WinRM (for Windows-based systems) to access your infrastructure and run tasks.
The greatest strength of Ansible is the base on which it was built. The declarative model makes infrastructure automation less challenging. This declarative nature, coupled with other features in Ansible, guarantees that when the same playbook is run again, it will deliver the same result without causing other unwanted changes.
Run your deployments in a scalable and cost-effective open cloud infrastructure. Cherry Servers' secure virtual private servers offer automatic scaling, flexible pricing, and 24/7 technical support. Our pre-defined Ansible module helps you automate the installation and configuration.
#What is Ansible used for?
Ansible is commonly used for:
- Automating repetitive administrative tasks such as system updates and package installations.
- Managing configurations across large clusters of servers.
- Deploying multi-tier applications with ease.
- Ensuring configuration consistency through version-controlled playbooks.
By defining desired states and leveraging Ansible’s idempotent nature, you can ensure environments remain stable and predictable.
#How to install Ansible on Ubuntu 24.04
In this section, you will be taken through installing Ansible. At the end of the tutorial, you will have an up-and-running Ansible environment for managing your systems.
In this tutorial, I will be using three servers. Ansible will be installed on one (controller node), and the other two will be used as the managed nodes where the Ansible tasks will be run.
#Step 1: Update system packages
Before you start, make sure you are logged in to your controller node Keeping your system updated ensures you have the latest security patches and software improvements.
sudo apt update && sudo apt upgrade -y
The apt update command refreshes the package lists for upgrades and new package versions. The apt upgrade -y command upgrades installed packages to their latest versions, with -y automatically confirming prompts.
#Step 2: Install software properties common
An important aspect of this step is the software-properties-common package, which manages PPAs and makes it easier to install software from third-party sources.
sudo apt install software-properties-common -y
#Step 3: Add Ansible Official PPA (Personal Package Archive)
To ensure you have access to the latest stable release of Ansible, add the official Ansible PPA
sudo add-apt-repository --yes --update ppa:ansible/ansible
add-apt-repository: Adds a new PPA to your system.--yes: Confirms the addition without manual input.--update: Updates package information immediately after adding the PPA.
#Step 4: Install Ansible
Once the PPA is added, installing Ansible is straightforward.
sudo apt install ansible -y
This command installs Ansible and all necessary dependencies.
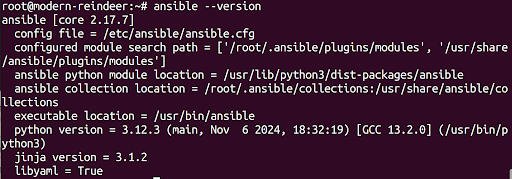
#Step 5: Verify Ansible Installation
Confirm that Ansible was installed successfully and check its version.
ansible --version
This command displays the installed Ansible version and related configuration paths, ensuring the tool is ready for use.
Also read: How to install Webmin on Ubuntu 24.04
#Install Ansible with Pip (alternative method)
Installing Ansible via 'pip' offers flexibility and control if you prefer managing Python packages independently from your system’s package manager. This method is particularly useful in environments where package repositories may not have the latest version of Ansible or when working in isolated development environments.
1. Before installing Ansible via pip, install python3 and pip3:
sudo apt update
sudo apt install python3 python3-pip  -y
2. Verify the installations:
python3 --version
pip3 --version

3. Install the venv module if it's not already installed. Setting up an environment guarantees that Ansible and all of its dependencies do not conflict with system-level Python packages.
sudo apt install python3-venv -y
4. Create and activate a virtual environment:
python3 -m venv ansible_env
source ansible_env/bin/activate
Your terminal prompt should now indicate that the virtual environment is active.
5. Once the environment is ready, install Ansible:
pip3 install ansible
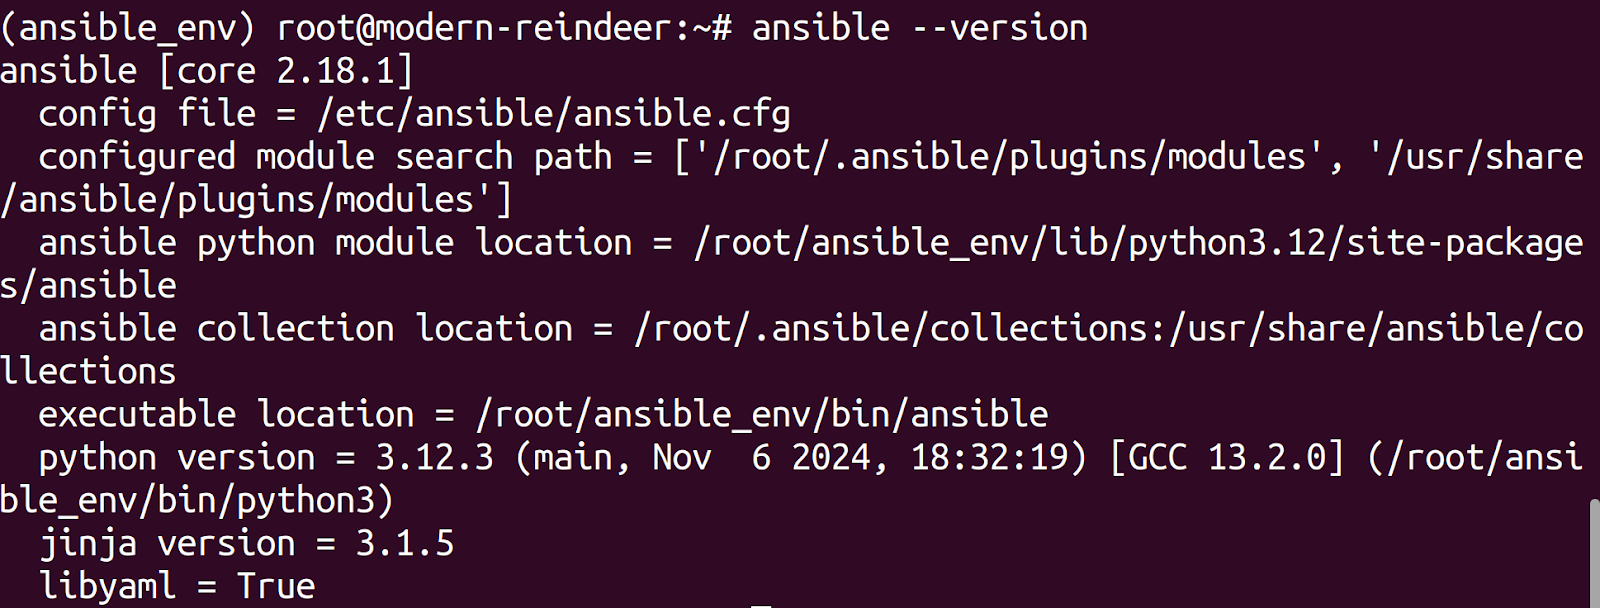
6. Verify the installation. Confirm that Ansible is successfully installed and available by checking the version:
ansible --version
 To update Ansible to the latest version:
pip3 install --upgrade ansible
7. When you're done, deactivate the virtual environment by running:
deactivate
#Benefits of using pip installation
- Virtual environments allow isolated environments for different projects.
- Easily replicate environments using for consistent deployments.
Note: Using
pipfor Ansible installations may require extra attention when setting up certain system dependencies or plugins, such asansible-coreor additional modules for cloud integrations.
#Step 7: Configure Ansible with a custom inventory file
After installation, configure Ansible by setting up an inventory file and writing a simple playbook. The inventory file is a component of Ansible that lists all the managed nodes and organizes them into groups, making it easier to target specific systems for automation tasks. A playbook, on the other hand, defines a series of tasks that Ansible should execute on those nodes. Together, these components form the core of Ansible's automation framework.
Ansible comes with a default inventory file located at /etc/ansible/hosts. This file can be used to define managed nodes and their groupings. However, modifying the default inventory file is generally discouraged for several reasons. Instead, creating a dedicated inventory file within your project directory or other specific locations ensures better organization and maintainability.
Here are the reasons why it might not be advisable to use the default inventory file:
- Keeping your custom configurations separate helps maintain clarity and avoids accidental changes to system defaults.
- Custom inventory files stored in your project directory can be easily tracked using version control systems.
- Custom inventories allow different files for different environments, such as development, testing, and production.
1. Choose a directory for your custom inventory file, such as your project folder.
mkdir ~/ansible-project
cd ~/ansible-project
nano custom_inventory.ini
Add the following content to the file:
[webservers]
5.199.173.225

[databases]
5.199.173.29
Replace the IP addresses with your live server IP addresses. You can add as many as you want. [webservers] and [databases] are host groups and IP addresses represent individual servers in each group.
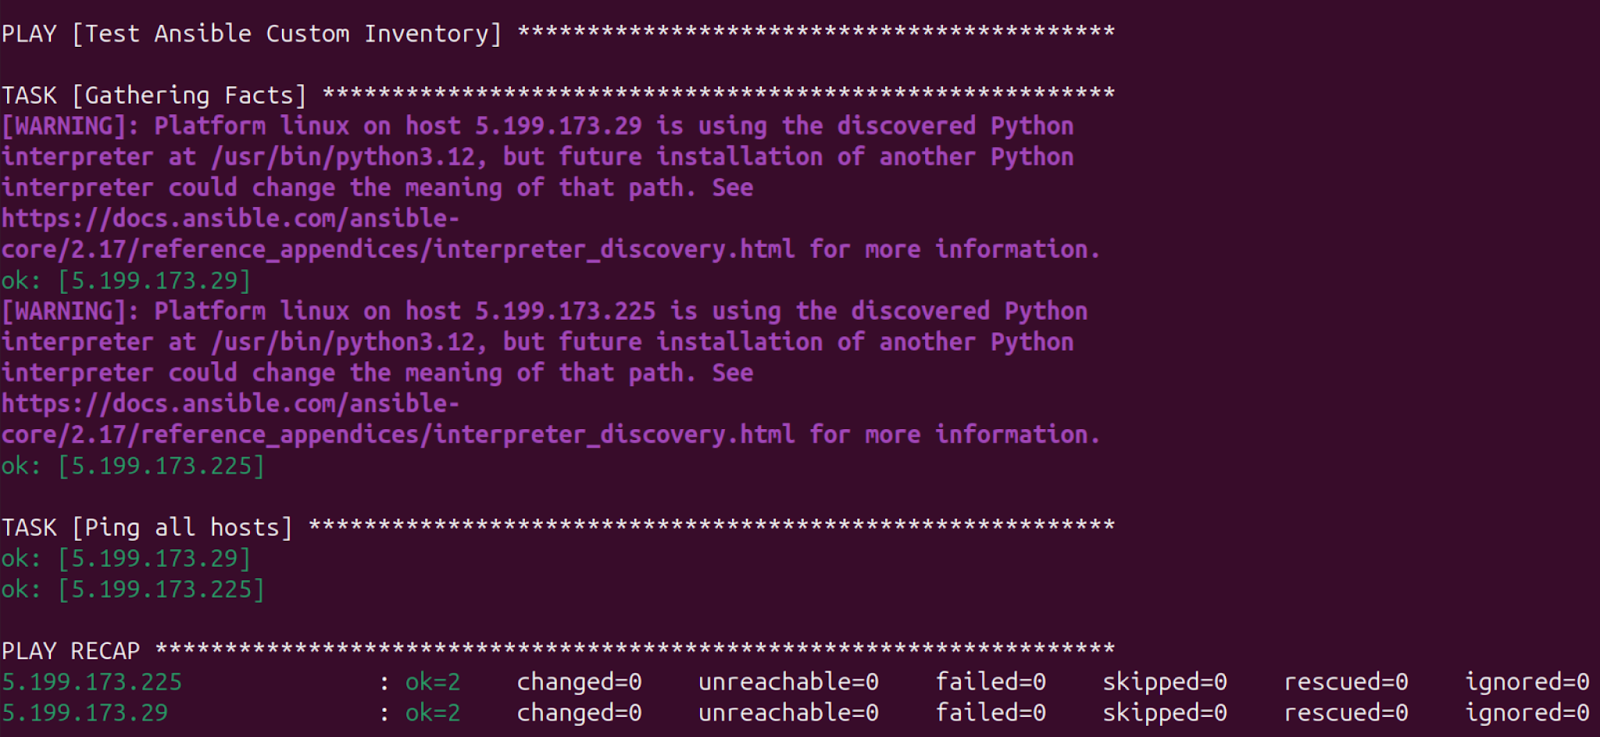
2. Create a playbook to ping all hosts in the inventory:
nano test-playbook.yml
Add the following YAML content:
---
- name: Test Ansible Custom Inventory
  hosts: all
  tasks:
    - name: Ping all hosts
      ansible.builtin.ping:
name: Describes the task.
hosts: all: Runs the task on all hosts in the custom inventory.
ansible.builtin.ping: Checks connectivity to each host.
3. Ansible uses SSH for communication so generate a key pair on your local machine if not already done. You are generating from the machine you are hosting Ansible from:
ssh-keygen -t rsa -b 2048
4. Copy the public key to the remote hosts:
ssh-copy-id root@5.199.173.225
ssh-copy-id root@5.199.173.29
Replace the IP addresses with yours.
5. Execute the playbook by specifying the custom inventory file:
ansible-playbook -i custom_inventory.ini test-playbook.yml
6. Execute the playbook by specifying the custom inventory file:
ansible-playbook -i custom_inventory.ini test-playbook.yml
If everything is configured correctly, Ansible will successfully ping each host listed in your custom inventory.
With this base established you can start working on more complex automation tasks, such as configuring servers, deploying applications, managing services, integrating with cloud platforms, and so on.
Also read: How Does 'When' Condition Work in Ansible
#Conclusion
In this tutorial, you learned how to install and configure Ansible on Ubuntu 24.04, covering both package-based and pip-based methods. We set up an inventory and ran a simple playbook, to verify that Ansible is ready for automation tasks. With Ansible installed and tested, you can begin building more complex automation solutions to streamline your IT operations.