How to Use Rsync on Linux to Synchronize Local and Remote Directories?

Rsync, short for remote sync, is a file transfer and synchronization tool that securely copies and synchronizes files between two directories. One must be a source and the other a destination, which may also be remote. It uses a delta-transfer algorithm that sends only the differences between the source and destination files or folders. Thus, it makes for a bandwidth-efficient tool and a sound choice for incremental data transfers.
Rsync is a perfect alternative for the scp command which is now deprecated due to vulnerability concerns. Rsync is widely used for offsite backups and mirroring.
By default, rsync comes pre-installed on modern Linux distributions, and therefore, no installation is required. In this article, we explore various ways you can use the rsync tool to transfer files and synchronize local and remote directories.
#Prerequisites
For this guide, we will demonstrate file transfer and synchronization on both local and remote setups. For the remote setup, we have the following lab environment:
- Source system: 173.82.232.55
- Destination system: 173.82.227.89
In addition, rsync needs to be installed on both systems. However, as we have mentioned, it is pre-installed in most modern Linux distributions, and therefore, no installation is required. But just to be sure, you can confirm if rsync is installed by running the command:
rsync --version
The snippet below proves that rsync is installed.
#Use Rsync to Sync Files locally
The rsync syntax closely resembles that of other tools such as scp and cp.
For demonstration purposes we will create two directories; mydir1 which will act as the source directory and mydir2 which will be the destination directory.
mkdir mydir1

mkdir mydir2
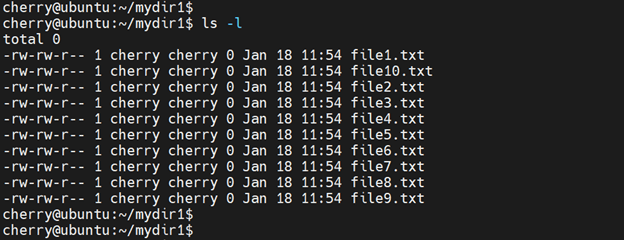
Next, we will navigate into mydir1 and create 10 empty text files that we will later copy and sync to mydir2 which is the destination folder.
cd mydir1

touch file{1..10}.txt
To confirm the existence of the files, run the ls command as follows
ls -l
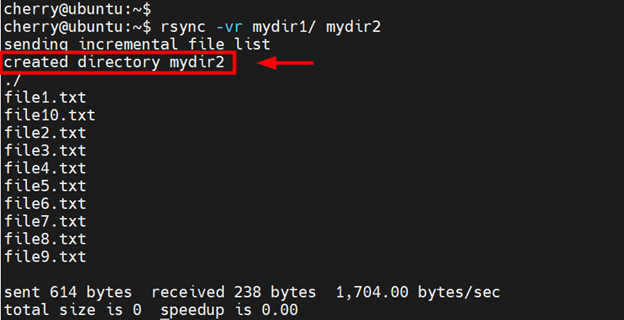
To copy the files from mydir1 to mydir2, run the rsync command as follows.
rsync -vr mydir1/ mydir2
The -v or --verbose option prints out verbose output on the terminal detailing the file transfer process. The information displayed includes the files being copied and a summary of the total file size and bandwidth used.
The -r or --recursive option recursively copies all the files and subdirectories in a directory.
If the specified destination folder does not exist, one is automatically created, and rsync copies all the data to it.
NOTE:
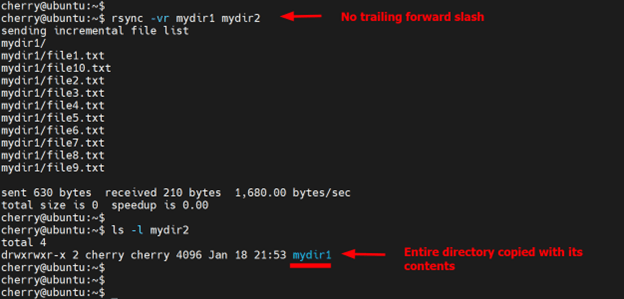
Note the trailing slash (/) at the end of the source file. This implies that only the contents of the directory will be copied. Without the trailing slash, the rsync command copies the entire mydir1 directory as opposed to its contents.
Below is a snippet that shows what happens when the trailing slash is omitted. The entire directory is copied with its contents inside of it.
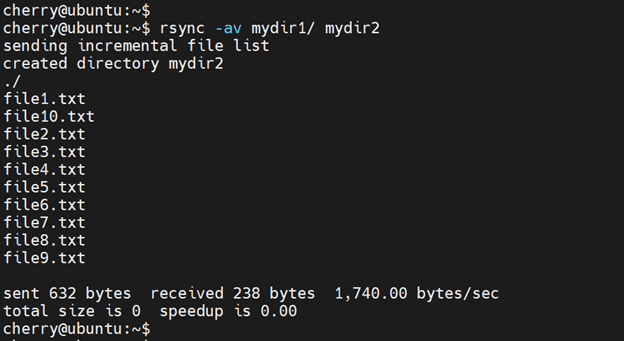
A perfect alternative to -r is the -a(--archive) flag. The option syncs the files recursively and preserves file attributes such as file permissions, group and user ownership, modification times, symbolic links, etc. It's the most recommended option to use.
Instead of using the -r flag, pass the -a option.
$ rsync -av mydir1/ mydir2
#Exclude a Specific File From Being Copied
To exclude a specific file from being transferred, pass the --exclude option as shown:
rsync -av --exclude=file source-directory/ destination-directory
For example, to exclude file1.txt from being copied to the destination directory, we will run the command:
rsync -av --exclude=file1.txt mydir1/ mydir2
To exclude multiple files, enclose them in curly braces separated by commas with no spaces in between. In the example below, the files file1.txt and file2.txthave been excluded from the file transfer operation.
rsync -av --exclude={file1.txt,file2.txt} mydir1/ mydir2
#Exclude a Specific Directory From Being copied.
Excluding a specific directory is similar to excluding a file. Just pass the --exclude option as shown below:
rsync -av --exclude=dir source-directory/ destination-directory
Suppose we have a directory called data inside the source directory. To exclude it from being copied, we will run the following command:
rsync -av --exclude=data mydir1/ mydir2
To exclude multiple directories, specify them inside curly braces separated by commas with no spaces in between. In the example below, the directories data and data2 have been excluded from the transfer operation.
rsync -av --exclude={data,data2} mydir1/ mydir2
#Use Rsync to Perform a Dry Run
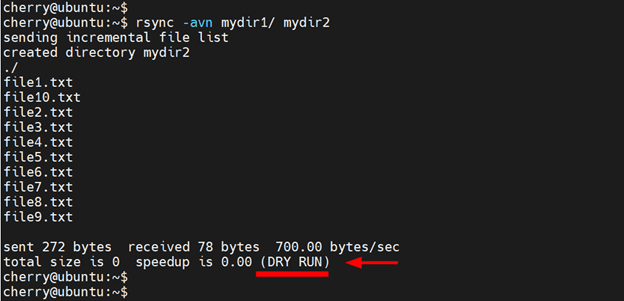
Before executing the rsync command, you can pass the -n or --dry-run options to counter-check how the command will run. This simply performs a simulation of the file transfer and no action is performed. To make the most out of this, you can combine the a, n, and v flags in one command as follows.
$ rsync -avn mydir1/ mydir2
At the bottom, you will find the DRY RUN tag indicating that the command execution was simply a simulation of the file transfer process.
#Use Rsync to Sync Files Remotely
The rsync tool also makes it possible to transfer files and directories to and from a remote system. For this feature to work, a few conditions must be satisfied.
First, the rsync utility needs to be present on both systems (local and remote). Also, since rsync uses SSH to connect to remote hosts, you need to configure passwordless SSH login between the two systems. We have detailed how to do this in step 2 of our Ansible Inventory guide.
#Push Files to a Remote Location
As earlier mentioned, rsync can transfer files from a local to a remote system and vice-versa.
Copying files from a local to a remote system is called a ** push** operation because you are essentially ‘pushing’ or syncing files to the remote system. It takes the following syntax:
rsync [options] source [user@host-ip]:dest-on-remote-machine
The opposite of this is known as a pull operation since you are retrieving or ‘pulling’ files from the remote to the local system. The syntax for this is as follows:
rsync [options] [user@host-ip]:source dest-on-local-machine
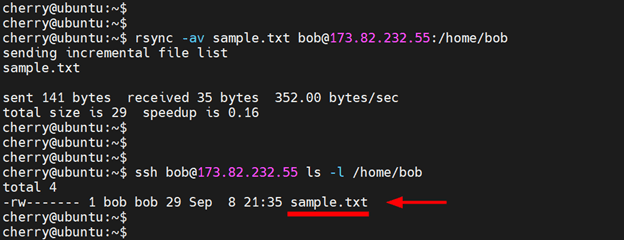
For example, to copy or sync a file called sample.txt from the local machine to the home directory of a user called bob located a remote system, run the command as shown.
rsync -av sample.txt bob@173.82.232.55:/home/bob
Once the file transfer is complete, confirm the existence of the file using the following command.
ssh bob@173.82.232.55 ls -l /home/bob
NOTE:
If the file exists on the remote system, it will be overwritten. To save the file under a different name, specify the new name as shown.
rsync -av sample.txt bob@173.82.232.55:/home/bob/sample2.txt
#Pull Files From a Remote Location
To copy a file called remote-file.txt from the SSremote system to a directory called data on the local system, run the command:
rsync -av bob@173.82.232.55:remote-file.txt /home/cherry/data
#Remote File Copy Syntax
Transferring directories with rsync over SSH follows the same syntax.
Recall that rsync treats source directories with a trailing slash differently. With a trailing slash, rsync copies only the contents of the source directory to the destination directory. When the trailing slash is omitted, the entire source directory is copied inside the destination directory. Therefore, you might consider leaving out the trailing slash if you want to copy the entire source directory.
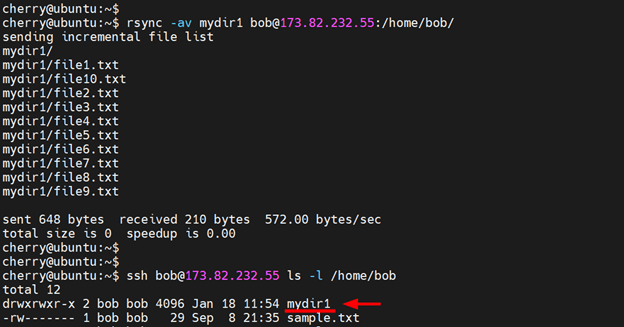
For example, to copy mydir1from the local machine to the remote machine, you would run the command:
rsync -av mydir1 bob@173.82.232.55:/home/bob/
From the output, you can see that the entire directory has been copied to the remote system.
#Synchronize Local and Remote Directories
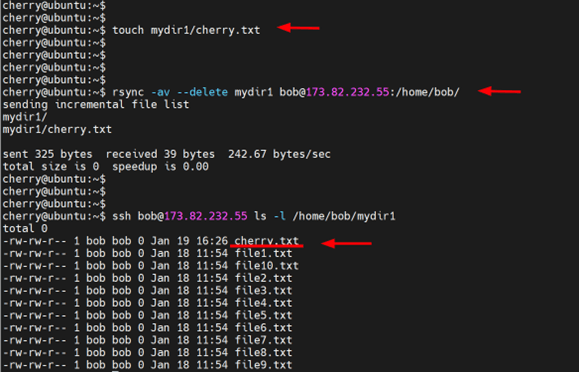
To synchronize the local and remote directories, use the --delete option. To demonstrate this, we will create a new file called cherry.txt inside the mydir1 folder.
touch mydir/cherry.txt
Next, we will synchronize the changes made in the mydir1 folder with that on the remote machine as follows.
rsync -av --delete mydir1 bob@173.82.232.55:/home/bob/
During synchronization, only the new file is added to the remote folder and everything else remains the same.
CAUTION:
Be extra careful when using the --delete option as it deletes files in the destination directory if they don't exist in the source directory.
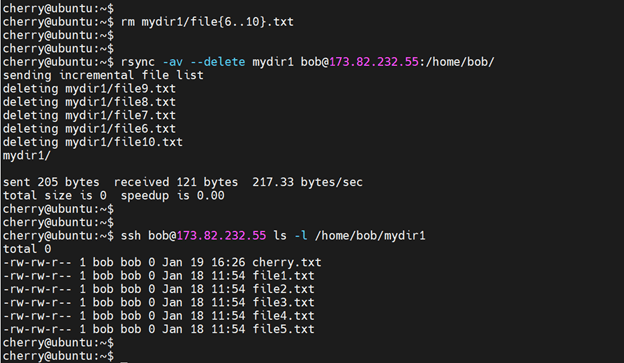
To demonstrate this, we will delete a few files in the source folder.
rm mydir1/file{6..10}.txt
When the directories are synchronized, the missing files which have just been deleted in the source directory are also deleted in the destination folder to restore parity.
rsync -av --delete mydir1 bob@173.82.232.55:/home/bob/
You can confirm this by listing the files in the remote directory as follows.
ssh bob@173.82.232.55 ls -l /home/bob/mydir1
#Compress Files and See Transfer Progress
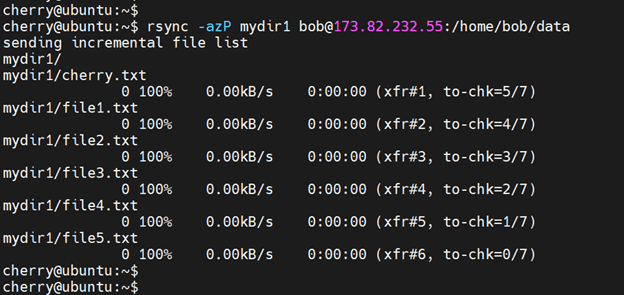
Other useful options that you can use with rsync are -z and -P.
The -z option compresses file data during file transfer thereby optimizing the bandwidth usage, while the -P option displays the progress bar. The two options can be combined as follows.
rsync -azP mydir1 bob@173.82.232.55:/home/bob/data
#Conclusion
Rsync is a versatile and secure tool that streamlines file transfer and synchronization over TCP/IP networks. It copies locally and to/from another host over a remote shell. It provides a myriad of options that control every aspect of its usage.
For more information about the rsync tool, check out the online man page. Alternatively, you can access the man pages from the command line as shown.
man rsync
Additionally, you can explore more command-line options by checking out the rsync help page as follows.
rsync --help
And there you have it. In this article, we have discussed the rsync tool and demonstrated, with examples, how you can transfer and synchronize files both locally and between two Linux systems.
Starting at just $3.24 / month, get virtual servers with top-tier performance.


