How To Set Up Ansible Inventory File

#What Is Ansible?
Ansible is a modern application deployment and configuration management tool that is very powerful and simple to use. It makes it easy to handle thousands of remote servers, also known as managed nodes, from a single control node. Ansible allows you to easily reproduce configuration environments and saves you from logging into individual servers and configuring them one by one.
Tracking thousands of remote servers may become a hassle even in Ansible, so it is vital to understand how to group and target your managed nodes by using a special file known as the inventory file.
#What is Ansible Inventory File?
Ansible inventory file allows system administrators to keep track of their managed remote systems. The default inventory file is known as the hosts file and is located in the /etc/ansible directory. This is where all the managed remote nodes are specified.
Ansible also gives you the flexibility to create a custom inventory file at your preferred location on your control node to suit your preferences. This is ideal when you have a complex environment and need to segregate your managed nodes into separate inventory files instead of having them all in the hosts file.
In this guide, you are going to install Ansible and set up your custom inventory file on the control node.
#Prerequisites
To demonstrate how remote servers can be defined within an inventory file, we are going to use the following setup where all servers are deployed with Ubuntu 20.04 operating system:
Ansible control node: This is the server on which Ansible is installed. It is used to your managed nodes via SSH and manage them.
Managed nodes: These are the remote nodes that will be managed from the Ansible control node:
Node1: 198.148.118.68
Node2: 198.148.118.129
Our small lab setup will be enough to illustrate how you can work with Ansible inventory file to manage your remote systems. However, there is no limit to the number of managed nodes that you can have.
Run your deployments in a scalable and cost-effective open cloud infrastructure. Cherry Servers' secure virtual private servers offer automatic scaling, flexible pricing, and 24/7 technical support. Our pre-defined Ansible module helps you automate the installation and configuration.
#Install Ansible on Ubuntu 20.04
Our very first step will be to install Ansible on the control node. So, login to your control node via SSH or using a free SSH client like PuTTY.
Once logged in, update the system package lists by running the following command. The -y option automatically assumes “yes” as an answer to all command line prompts.
sudo apt update
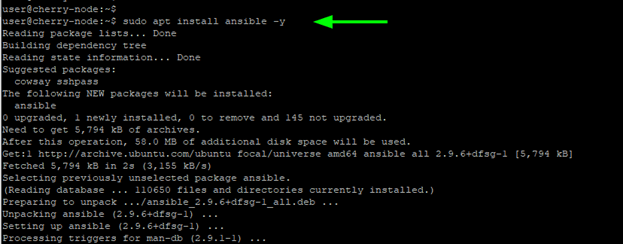
Next, install Ansible:
sudo apt install -y ansible
This installs Ansible and a host of other additional packages and dependencies. Upon completion verify that Ansible is installed by checking for its version:
ansible –-version
The output below is a proof that we have successfully installed Ansible version 2.9.6.
As mentioned earlier, there is a default inventory file is located at /etc/ansible/hosts. Once you open the file using your preferred command line editor, you will see some basic guidelines about what is expected.
sudo nano /etc/ansible/hosts
# This is the default ansible 'hosts' file.
#
# It should live in /etc/ansible/hosts
#
#   - Comments begin with the '#' character
#   - Blank lines are ignored
#   - Groups of hosts are delimited by [header] elements
#   - You can enter hostnames or ip addresses
#   - A hostname/ip can be a member of multiple groups

# Ex 1: Ungrouped hosts, specify before any group headers:

## green.example.com
## blue.example.com
## 192.168.100.1
## 192.168.100.10

# Ex 2: A collection of hosts belonging to the 'webservers' group:

## [webservers]
## alpha.example.org
## beta.example.org
## 192.168.1.100
## 192.168.1.110
By default, all entries are commented out and no hosts are specified. In the next step, you will connect to the remote hosts and create a custom inventory file.
#Set up Passwordless SSH Connection
Ansible is an agentless deployment tool that uses the SSH protocol to communicate with remote nodes. For this to happen seamlessly, we need to go an extra step and configure a passwordless SSH connection between the Ansible control node and the remote systems.
First, generate the SSH key pair with the following command:
ssh-keygen
It will create an SSH keypair that includes a public and private key which are stored in the .ssh/ folder in your home directory.
The private key should remain on the Ansible control node and should never be revealed or shared with anyone to avert security breaches such as man-in-the-middle attack. On the other hand, you can comfortably share the public key with any remote system of your choice.
To successfully configure a passwordless SSH connection, you need to copy the public key over to the remote nodes. You can easily do this using the ssh-copy-id command in the syntax shown:
ssh-copy-id user@server-ip-address
In our case, the command will be:
ssh-copy-id root@198.148.118.68
Key in the remote system’s password when prompted and press the ENTER key to copy the public key to the server.
To verify that we can login to the remote system without password authentication, we will attempt to login via SSH by proving the username followed by ‘@’ then the remote node’s IP address.
ssh root@198.148.118.68
The snippet provided below is a confirmation that we just logged in without a password to our remote node1.
The public key is saved in the ~/.ssh/authorized_keys file lon the remote node.
You may double check it is there:
cat ~/.ssh/authorized_keys
Repeat the same procedure for all your nodes and ensure you can SSH into them without password authentication.
#Create Custom Inventory File
Ansible uses the default inventory file that is located at /etc/ansible/hosts to reference managed nodes, unless you specify a custom inventory file through the -i option.
The default inventory file works just fine. In fact, you can put your remote nodes in it using their IP addresses, as shown below:
198.148.118.68
198.148.118.129
You can then execute a ping module on the remote nodes without explicitly specifying the remote hosts:
sudo ansible -m ping all
Sure, this works without any glitches, but when faced with multiple managed nodes under different projects, the best practice is to create separate inventory files for each project. This way you will facilitate resource tracking and collaborate with other sysadmins more easily without having everyone tangled up in a single hosts file.
Now, let’s create a custom inventory file. To do this, you should first create a project directory and navigate into it:
mkdir project_dir && cd project_dir
Next, create a simple text file. You can give it any arbitrary name:
nano inventory
Then list your managed nodes per line using their IP addresses:
198.148.118.68
198.148.118.129
Save the changes and exit the file. Now you can verify your managed hosts using the ansible-inventory command. Note that you must reference the full path to the inventory file when using the -i option.
ansible-inventory -i project_dir/inventory --list
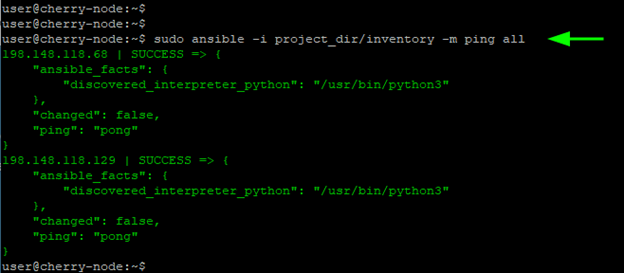
From here, you can execute a playbook or a ping module on your managed hosts using the custom inventory file:
sudo ansible -i project_dir/inventory -m ping all
#Organize Nodes Into Groups and Sub-groups
For a cleaner inventory file and easier management of your managed nodes, it is usually recommended to organize them into groups and subgroups.
A host can belong to one or multiple groups. In the example below, we have grouped our 2 hosts under the webservers group in an INI format.
[webservers]
198.148.118.68
198.148.118.129
The inventory file below provides a better illustration of multiple servers grouped into various groups such as webservers, load_balancers and db_servers.
[webservers]
198.148.118.68
198.148.118.129
198.148.118.150
198.148.118.175

[load_balancers]
198.148.118.100
198.148.118.200

[db_servers]
198.148.118.50
198.148.118.60
Once again, run the ansible-inventory command and you should see a similar arrangement to what we have here:
ansible-inventory -i project_dir/inventory --list
You can also define multiple groups as 'children' groups under a 'parent' group. In this scenario, the 'parent' group becomes the metagroup. Here is an illustration of how you can reorganize the previous inventory using metagroups:
[childgroup1]
node1
node2

[childgroup2]
node3
node4

[parent1:children]
childgroup1
childgroup2
With that in mind, we can reorganize our inventory as demonstrated below.
[webservers_miami]
198.148.118.68
198.148.118.129

[webservers_virginia]
198.148.118.150
198.148.118.175

[load_balancer_ohio]
198.148.118.100

 [load_balancer_texas]
198.148.118.200

[db_server_miami]
198.148.118.50

[db_server_virginia]
198.148.118.60

[webservers:children]
webservers_miami
webservers_virginia

[load_balancers:children]
load_balancer_ohio
load_balancer_texas

[db_servers:children]
db_server_miami
db_server_virginia
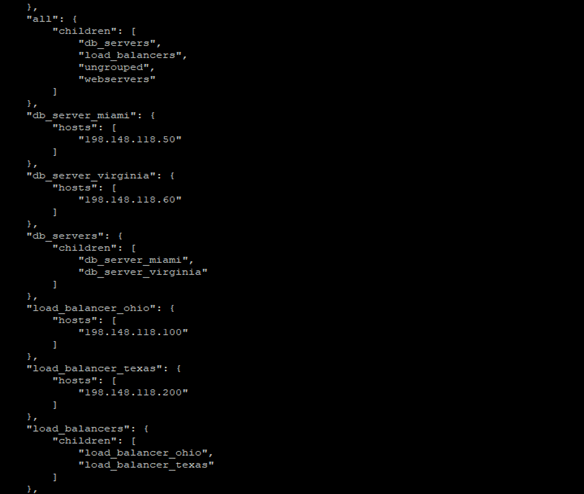
Once again, you can verify the inventory list as follows:
ansible-inventory -i project_dir/inventory --list
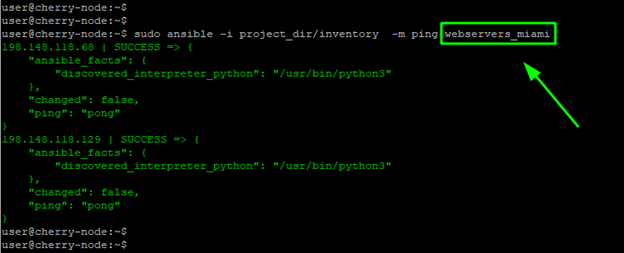
Such an arrangement helps you target smaller server groups with playbooks instead of targeting all nodes at once. For example, you can execute the ping module in the [webservers_miami] child group as follows:
sudo ansible -i project_dir/inventory -m ping webservers_miami
#Use Patterns to Target Execution of Commands
When running playbooks or ad hoc commands with Ansible, you are required to provide a target that is typically defined in the inventory file. Patterns provide flexibility in targeting specific hosts or groups in your inventory file. They support for wildcards, regex expressions and so much more.
To demonstrate how you can use Patterns, consider the inventory file below:
[webservers]
198.148.118.68
198.148.118.129
198.148.118.160

[db_servers]
198.148.118.55
198.148.118.110

[staging]
198.148.118.160
198.148.118.110

[production]
198.148.118.68
198.148.118.129
198.148.118.55
Suppose you want to execute an ad hoc command that targets only the webservers running on production. In this inventory, there are only two webservers matching this criterion: 198.148.118.68 and 198.148.118.129.
Instead of individually targeting the two target hosts, you can simply use the following matching pattern:
sudo ansible webservers:\&production -m ping
The ampersand symbol - & - represents the logical operation AND. This means that the valid hosts MUST be in both groups i.e. webservers and production. Since this is an ad hoc command, we need to insert the \ escape character in the command.
To target hosts that are in the webservers group BUT NOT in production, use the pattern as follows:
sudo ansible webservers:\!production -m ping
Here, the ! symbol represents the logical operator NOT and it indicates that the valid hosts MUST NOT be included in the production group. Once again, we need to include the \ escape character since we are running an ad hoc command that must be interpreted by the shell.
Below is a table that provides additional patterns that you can use when running ad hoc commands and playbooks with Ansible automation tool.
| Pattern | Target |
|---|---|
all |
All targets in your inventory file |
node1 |
A single node or host ( node1 ) |
node1:node2 |
Both node1 and node2 |
group1 |
Applies to all hosts in group1 only |
group1:group2 |
Applies to all hosts in both group1 and group2 |
group1:\&group2 |
Hosts or servers that are IN BOTH group1 and group2 |
group1:\&group2 |
Hosts or servers in group1 BUT NOT in group2 |
#Configure Host Aliases
Aliases are a simple way of referencing your managed nodes. Just like nicknames, they help you easily identify your resources without having to recall complicated names when running playbooks.
To define an alias, simply specify an alias name followed by a variable name corresponding to the hostname or IP of the remote host.
alias variable_name
For example:
primary_server   ansible_host=198.148.118.68`
secondary_server ansible_host=198.148.118.129`
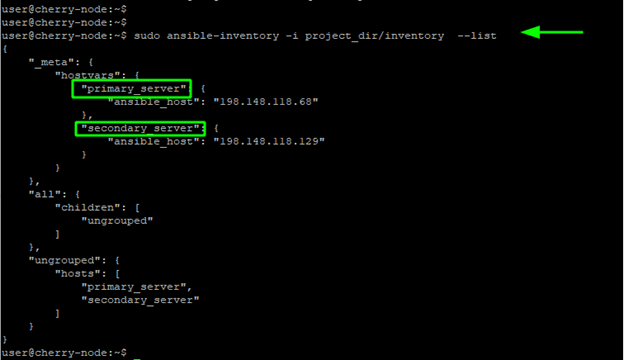
Then verify the inventory list to check if the nodes are referenced by aliases.
ansible-inventory -i project_dir/inventory --list
From the output we can see that the servers are now being referenced by their aliases. You can also run an ad-hoc command by referencing the node using the alias:
sudo ansible -i project_dir/inventory -m ping primary_server
#Configure Variable Names
In Ansible, variables are used to handle differences between managed hosts. Using variables, you can represent variations between systems when executing playbooks or ad hoc commands. For instance, in the previous section we used the ansible_host variable that simply told Ansible where to search for the IP address of a managed node.
In inventory files you can use variables to define hostnames, connection type, ports, etc. In the example below, we have gone a step further to define the user used to initiate the remote connection to the nodes.
In this case, we have two variables: ansible_host that specifies the IP of the hosts, and ansible_user that specifies the user used to connect with the remote hosts.
server01 ansible_host=198.148.118.68 ansible_user=root
server02 ansible_host=198.148.118.129 ansible_user=user
In addition, you can also create host groups and have variables at a group level. In this example, we have two separate variable groups - [webservers_a:vars] and [webservers_b:vars] which define the users to connect to the managed nodes.
[webservers_a]
server01 ansible_host=198.148.118.68

[webservers_b]
server02 ansible_host=198.148.118.129

[webservers_a:vars]
ansible_user=root

[webservers_b:vars]
ansible_user=user
#Ansible Use Cases
1. Configuration management: Ansible lets you describe exactly how every server should function. What software must be installed, what version it should be, and which services must be running. When you run the playbook, Ansible checks every machine and fixes anything that deviates from the plan. This keeps large groups of servers consistent without manual effort.
2. Application deployment: You can package an entire release process into one Ansible play, such as:
- Pulling the latest code
- installing or updating dependencies
- running database migrations.
Since each step runs only when something has changed, deployments become repeatable and easy to roll back by redeploying an earlier version.
3. Cloud provisioning and orchestration: Ansible can build cloud resources the same way it configures software. A playbook can create:
- Networks
- Databases
- Load balancers
- Scale AWS services
If anything is deleted or altered outside the playbook, rerunning it restores cloud functions in the desired state.
4. Network automation: Instead of logging into switches and routers one by one, you can use Ansible to push configuration updates or collect device information in bulk. Ansible can connect to Cisco, Juniper, and many other vendors over their native APIs or CLI. This makes it easy to apply changes safely and ensures every device ends up with the intended configuration.
5. Security and compliance automation: With Ansible, you can run regular patch jobs, launch vulnerability or compliance scans. Playbooks apply security updates, run tools like OpenSCAP, and flag any remaining critical issues so you can prove to auditors.
#Conclusion
In this tutorial, we took a deep dive into Ansible inventories and demonstrated how you can organize your managed hosts into groups and subgroups.
Then we went a step further and demonstrated how to use pattern to target certain groups of hosts, touched on aliases, and finally wrapped up with variables that allow certain key parameters vary from host to host.
For more information on how to build your inventory in Ansible, visit the official Ansible documentation.
If you found this tutorial helpful, read the next guide on how to use 'When' condition in Ansible
Cloud VPS Hosting
Starting at just $3.24 / month, get virtual servers with top-tier performance.


