How to Create a Dockerfile? Beginner’s Guide to Containerization


Containerization is a valuable skill in DevOps. It makes it easy for applications to be built and distributed across various computing environments including the cloud architecture. Containerizing your application simply means compressing and bundling the contents of your application into an image that can be executed and decompressed into a container.
Containerization isn’t a complex process. It's a simple procedure that involves writing a Dockerfile. A Dockerfile is a blueprint that orchestrates how your application and its dependencies bundle neatly into a self-sufficient Docker image.
It is crucial to understand a Dockerfile in detail and how it is essential in creating a container image. In this article, you will learn what a Dockerfile is and how to assemble your application content into an image using a Dockerfile.
#Prerequisites
A Linux instance with Docker and Git installed.
Follow the step-by-step instructions to learn how to install Docker on Ubuntu 24.04 and set up Git.
#What is a Dockerfile?
The process of creating a Docker container image starts with writing a Dockerfile. The Dockerfile is responsible for containerizing your application’s contents. Since the Dockerfile specifies the dependencies used to build containers, it determines the security and health of the container when running. Specifying insecure dependencies and incorrect network configuration in a Dockerfile corrupts the image.
The end result of executing a Dockerfile is a reproducible container image. If you provide someone else with your application’s source code and Dockerfile, they can build and run the same application on their machine or in the cloud. This level of portability is unmatched. No more issues like: “This code only works on my machine”. No more complicated instructions for setting up dependencies.
Ready to supercharge your Docker infrastructure? Scale effortlessly and enjoy flexible storage with Cherry Servers bare metal or virtual servers. Eliminate infrastructure headaches with free 24/7 technical support, pay-as-you-go pricing, and global availability.
#Components of a Dockerfile
A Dockerfile comprises different instructions for creating various container structure layers. Below are the instructions that must be specified when building an image.
1. FROM: A Dockerfile starts with a FROM instruction that specifies the base image used to build the container image. For example, you might start with a minimal Linux distribution like Alpine, or a standard language runtime such as Node.js.
FROM node:22
2. RUN: This instruction runs and executes commands. It also installs the specified dependencies or packages. For example, the instructions below instruct Docker to run the npm run build command during the build process.
RUN npm run build
3. COPY and ADD: These instructions copy your application’s contents in the current directory. The copied contents will then be compressed and containerized.
COPY . .
4. WORKDIR: This instruction sets the working directory from which commands will be executed. These commands: RUN, CMD, COPY, and ADD will use the path stated by the WORKDIR. For example, the root directory /app is set as the working directory for the Dockerfile.
WORKDIR /app
5. ENV: Sets the environment variables such as volumes. Environment variables can be useful for customizing the behavior of your application or setting configuration details that need to persist through build time and runtime.
ENV PATH="./node_modules/.bin:$PATH"
6. EXPOSE: This instruction sets the basic network interface for the container by specifying the port that the container should listen to.
EXPOSE 8080
7. CMD: Specifies the default command that will run when the container starts. In the example below, the commands npm, run, and start will run and start the Node.js application when the container is executed.
CMD ["npm", "run", "start"]
Each Dockerfile instruction that changes the image’s filesystem state results in a new layer. Docker caches these layers so that if you rerun a build and the initial layers haven’t changed, Docker can skip rebuilding them, significantly speeding up the process.
For optimal caching and efficiency, it’s wise to structure your Dockerfile so that frequently changed instructions appear near the bottom and the less frequently changed instructions appear at the top.
For example, specifying a base image (FROM) and installing system packages could appear early, while copying in your frequently updated application source code can appear later. This approach prevents the need to rebuild every layer from scratch when you make small code updates.
Also read: How to run Docker on Bare Metal Cloud
#How to create an image using a Dockerfile
Dockerfile enables you to containerize any application regardless of the framework or languages used to build an application. When creating a Dockerfile, it is important to ensure that the dependencies are secure to prevent building an image that contains insecurities.
Vulnerabilities that are exploited when containers are running are more detrimental and costly. This is because container insecurities compromise containerized applications and disrupt services. The issue gets worse when the container has been assigned host privileges. Containers that have host privileges escalate a security breach by paving the way for insecurities to infiltrate the host system.
Therefore, it is important to be cautious about the configurations you use to build the Dockerfile.
Also read: How to remove Docker images
#Containerize your application
1. Cloning a React application project
Execute the following command that clones a React application project on GitHub. You will containerize this demo application using the provided Dockerfile in the next steps.
git clone https://github.com/xTrilton/my-app.git
The above repository contains a Dockerfile that containerizes the application, you don't have to create a new one. After cloning the app, use the following command to change the directory to the application’s root directory where Dockerfile is located.
cd my-app
The Dockerfile contained in the application project creates an image for a React.js application that uses the Node.js library:node:19-alpine3.16. Node.js commands such as npm run build will be run when the Dockerfile gets executed. All of the instructions used in the Dockerfile below are explained in the previous section.
FROM node:19-alpine3.16
# set working direction (directory for my project)
WORKDIR /app
# set environment path
ENV PATH="./node_modules/.bin:$PATH"

COPY . .
# install npm dependencies
RUN npm install
# Build the application
RUN npm run build

# start an application (starting our react server)
CMD ["npm", "run", "start"]
2. Build the image
In your terminal, run the following command. Before executing this command, make sure that Docker is running.
docker build -t [Your-application's name]:latest .
For example,
docker build -t my-app:latest .
The . in the command tells Docker to look for the Dockerfile in the current directory. The latest parameter tags the version of the container as the up-to-date version.
When you run docker build against a directory containing a Dockerfile, Docker executes Dockerfile instructions step-by-step. Layers allow Docker to cache intermediate states and speed up future builds.
3. Verify the image creation process
Use the following command to check if the image was built successfully:
docker images
If the image was created successfully, you will get the following output showing the name of the image you just created and its details. Your application’s project name will be the image name. The output can also include the base image which is node:19-alpine3.16.
![]()
4. Run the container
Once the image is built, start a container using the following command:
docker run -dp 127.0.0.1:3000:3000 my-app
The above command launches a new container in detached mode (-d), allowing it to run in the background. The -p flag maps port 3000 of the host machine to port 3000 inside the container, specifically binding it to the localhost IP address 127.0.0.1. This means the application running inside the container is accessible only from the host machine via http://127.0.0.1:3000, enhancing security by preventing external access.
5. Check container details
Use the following command to check if the container has been created and running.
docker ps
You will get the following output that shows that the my-first-app container is running.
![]()
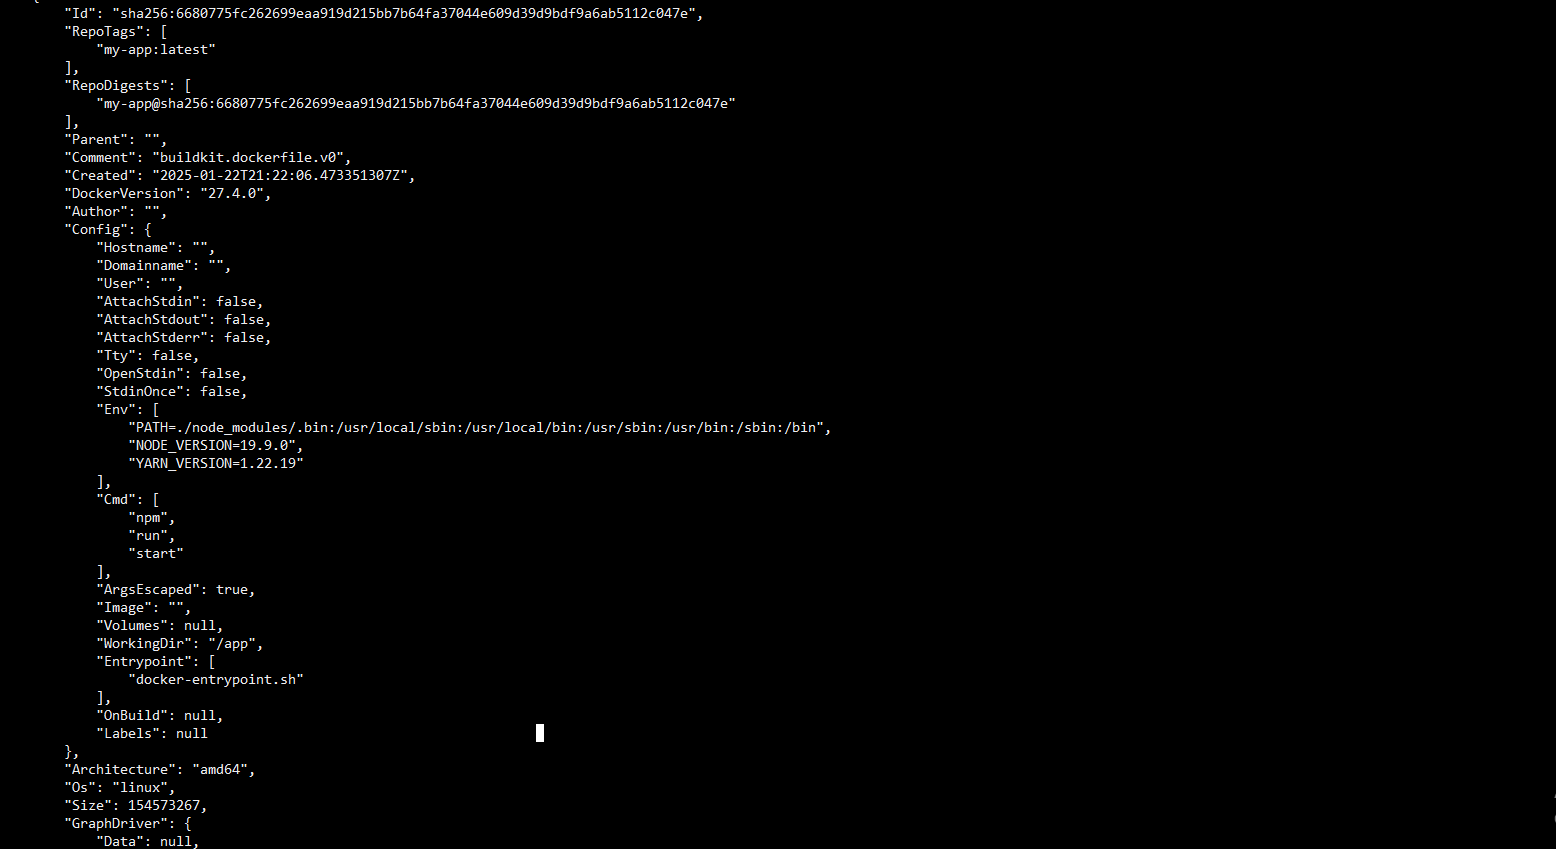
Next, use the following command to get more granular details using the following command.
docker inspect [OPTIONS] CONTAINER
For example,
docker inspect my-app
You will get the following output that shows container details.
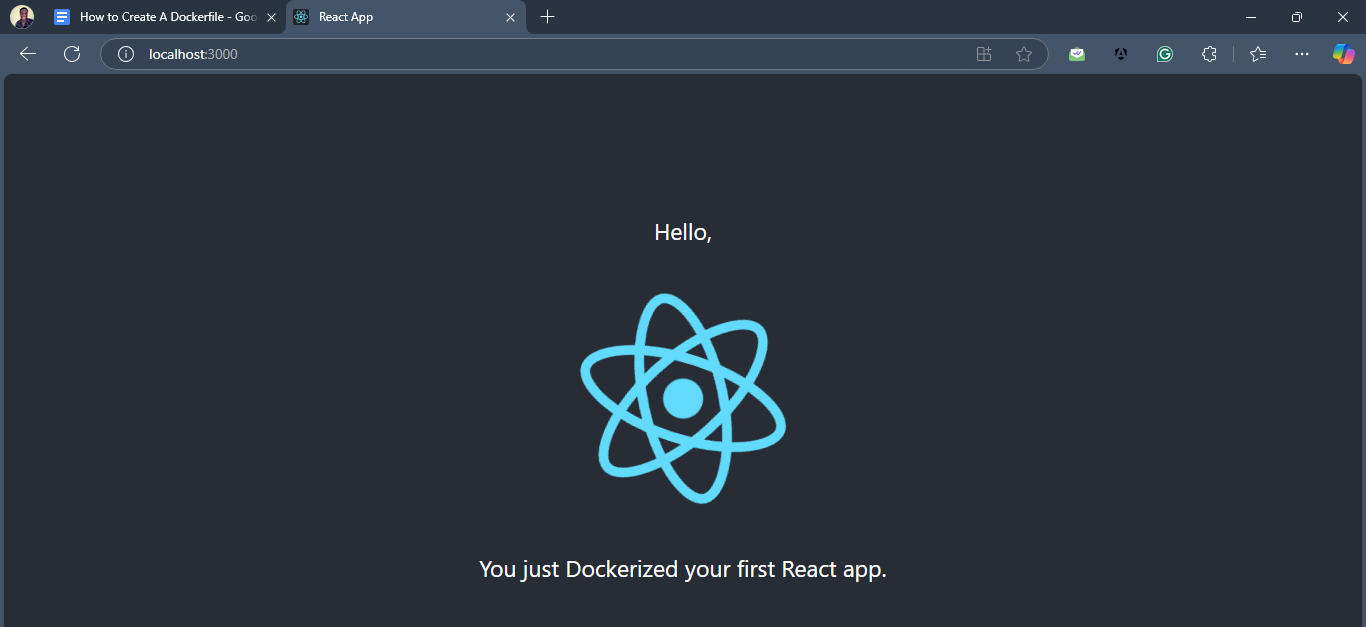
6. Access the container
Once the container is running, you can access it at http://localhost:3000/.
Also read: How to restart Docker
#Conclusion
In this article, you have learned what a Dockerfile is in detail and what its components are. In addition, you have learned how to create an image using a Dockerfile. Containerizing an application is not a complicated process as long as you know how to use the instructions needed to create a Dockerfile. It is also important to verify if the image and container were created before accessing the containerized application.
Consistently creating images leads to an endless list of important and redundant images. It is important to save container images that containerize different application versions. This is beneficial in case the new application version is not working as expected and now you have to roll back to older application versions that work better. You can easily save and backup images at a lower cost using Cherry Servers backup storage solutions by signing up today.