How to Add a User to Sudoers in Ubuntu [Step-by-Step]

![How to Add a User to Sudoers in Ubuntu [Step-by-Step]](/v3/img/containers/blog_main/linux.jpg/748968b22f1e35f466bfd77a447e6134/linux.jpg?id=1739046670)


In Linux, as with any operating system, the recommended practice is to designate standard tasks to regular users while limiting administrative or privileged ones to the root user. On occasion, you may need elevated privileges as a regular user to run root-level tasks. In such scenarios, creating a sudo user is essential.
#What is a sudo user
A sudo (Super User do) user is a regular Linux user with permission to execute privileged commands as the root user. For this to happen, the user needs to be added to the sudo group or /etc/sudoers file. The sudoers file controls who can run what command in the system.
The sudo command grants elevated privileges to a sudo user to run root-level tasks. This way, the user can invoke sudo and safely run system-level tasks without switching to root.
In this tutorial, you will learn how to add a user to sudoers in Ubuntu with examples.
#Prerequisites
To follow along in this tutorial, ensure you have the following in place:
An instance of Ubuntu. In this guide, we are using Ubuntu 24.04 LTS.
A root user or access to a pre-existing sudo user for running privileged tasks.
#Adding user to sudoers in Ubuntu
In Ubuntu and Debian-based systems, the easiest way of creating a sudo user is by adding a regular user to the sudo group. The sudo group is a pre-existing group on the system. Members of this group acquire elevated privileges to carry out root-level tasks using the sudo command.
We will start by creating a regular user and later add the user to the sudo group. If you already have a regular user created, follow along from Step 2.
#Step 1: Create a regular User in Ubuntu
To get off the ground, log into your instance. We will start by creating a new regular user account. To create a new user account, run the adduser account followed by the user’s login name.
sudo adduser username
For example, to create a regular user called cherry, run the following command:
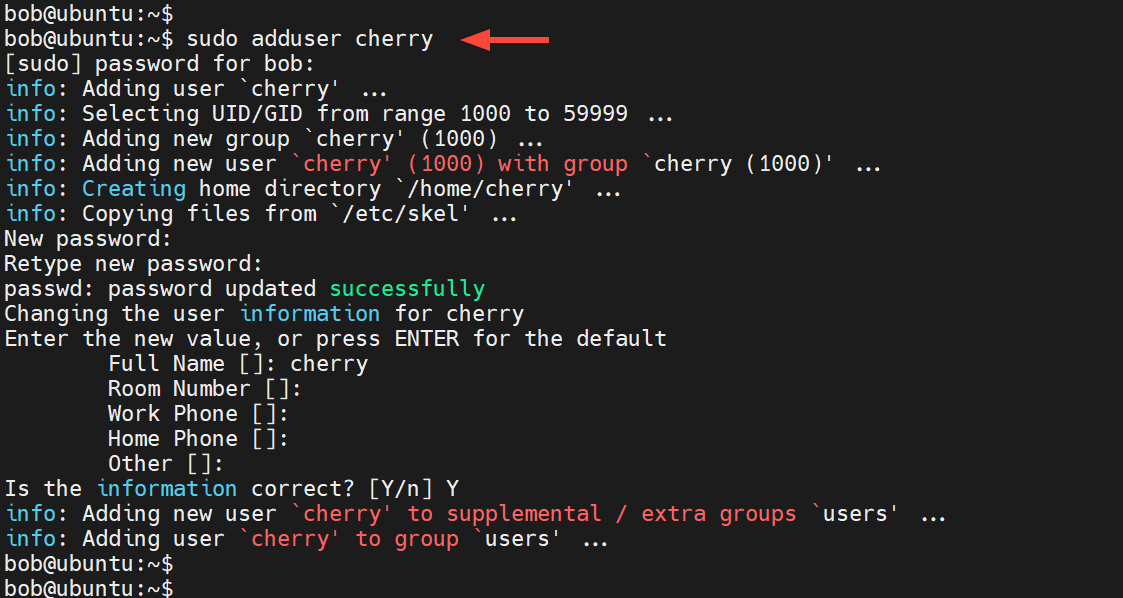
sudo adduser cherry
The adduser command provides an interactive way for adding users to the system by prompting user details.
When you execute the command, a series of events happen. The command creates a user called cherry and assigns a UID (User ID) to the user from the UID range of 1000 to 59999. It then creates a new group that corresponds to the username and adds the user to the group. This is also known as the primary group. Next, the command creates a home directory, and copies user-specific configuration files from /etc/skel to the home directory.
Next, you will be prompted for the user’s password and later asked to confirm it.
You will then be required to provide additional information such as the user's login name, room number, work phone, etc. These are optional fields and you can fill or leave them blank. To skip the entries, just press ENTER.
Finally, type Y and hit ENTER to save the values you have just provided. The user is eventually added to a supplemental or extra group called users.
To check the groups the user belongs to, run the groups command followed by the username.
groups cherry
From the output, you can see that the user belongs to two groups:cherry group which is the primary group, and users, the supplementary group.

#Step 2: Add a regular user to the sudo group /sudoers file
So far, you have created a regular login user called cherry. However, the user is only limited to standard tasks on the system. If you run a privileged task with the sudo command, you will be notified that the user is not in the sudoers file, and the command will not be executed.

To run privileged tasks on the system, you need to add the user to the sudo group. The sudoers file already has a sudo group entry that specifies permissions for users that belong to the group. Thus the recommended approach is to add the regular user to the sudo group and leave the sudoers file intact.
Users added to the sudo group acquire permissions to run elevated tasks on the system using the sudo command.
There are two main ways of adding a user to the sudo group. You can use the usermod or adduser commands. Let’s take a look at each of these.
Adding a regular user to sudo group using usermod command
The usermod command is a command-line tool used to modify user accounts. It modifies various user attributes including the uid, shell, and login name. You can also use it to change the user’s default group and add a user to an existing group.
To add a user to the sudo group, use the usermod syntax as shown below.
sudo usermod -aG sudo username
The command can also take the following format where a and G options are specified separately using a hyphen.
sudo usermod -a -G sudo username
For example, to add the user called cherry to the sudo group, run the command:
sudo usermod -aG sudo cherry
The -a option appends the user to a secondary group while the -G option specifies the name of the group that the user is being added to, in this case, sudo.

Adding a regular user to sudo group using adduser command
The adduser command is typically used to create or add new users to the system. In addition, you can also use it to add an existing user to another group using the following syntax.
sudo adduser username group
For example, to add a user called alice to sudo group, run the command:
sudo adduser alice sudo
Output
info: Adding user `alice` to group `sudo' ...

#Step 3: Confirm user belongs to sudo group
To verify that the user has been added to the sudo group, run the groups command followed by the username. For example, to confirm that user cherry is part of sudo group, run the command:
groups cherry
This time around, you will see that the user belongs to three groups: the two original groups ( cherry and users ) and sudo.
Alternatively, you can run the id command followed by the username. This provides a more detailed output which includes the UID of the user, and the groups the user belongs to along with their GIDs.
id cherry
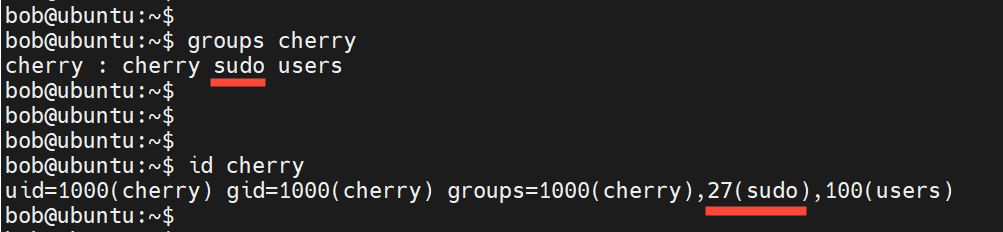
The commands we have just executed confirm that the user has successfully been added to the sudo group.
#Step 4: Run privileged tasks as sudo user
So far, you have created a regular user and added them to the sudo group. As we mentioned in the introduction, a sudo user possesses permission to run elevated or privileged tasks on the system. Let’s see this in action.
Be sure to switch to the user using the su - command followed by the username.
For example, to switch to user cherry, run the command:
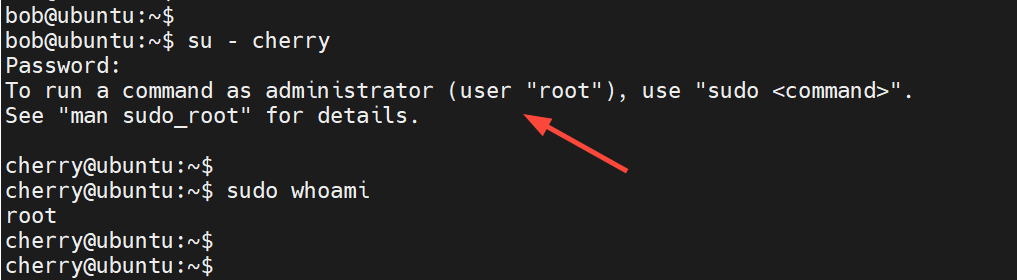
su - cherry
Provide the user’s password and hit ENTER. This takes you straight to the user’s home directory.
Once you have switched to the sudo user for the first time, you will see a notification informing you of how to run commands as root using the sudo command.
When you run the whoami command with sudo, you will get root as the output. This indicates you can run commands as root by invoking sudo.
sudo whoami
Now run a command that requires elevated privileges. To run commands as a sudo user, use the following syntax:
sudo <command>
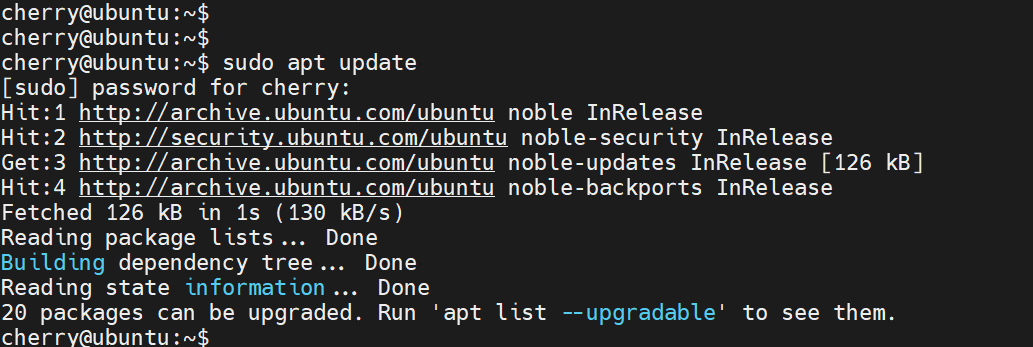
In this example, we are running the apt update command which updates the local package lists on the system which are defined in the /etc/apt/sources.list file and /etc/apt/sources.list.d directory.
sudo apt update
Once you run the command, provide the user’s password and hit ENTER to start executing it. From the output, you can see that the command executed successfully.
#Conclusion
This tutorial taught you how to create a sudo user in Ubuntu. Check out the sudo man pages for more information about the sudo command including the available command-line options.