A Complete Guide to Linux Bash History

Developers, sysadmins, and DevOps engineers spend a lot of time at the Linux command line. And, invariably, we make tpyos typos. Other times, we just need to run the same command again or determine what commands were previously executed on a system. In all of those cases, knowing how to work with Linux bash history command helps.
In this article, we'll take a closer look at what bash history is, how it works, and how you can use it to become more efficient when you're working at the Linux command line. You can follow along with the commands in this article using almost any modern *nix operating system with bash.
#What is Bash history?
The term bash history refers to the commands, files, and shortcuts that allow you to view, modify, and delete bash commands that have been run on a system.
Bash has two bulitin commands for working with bash history:
history- Allows you to list commands and modify your bash history.fc- Allows you to list, edit, and execute commands from your bash history.
Because the term "bash history" often implies the history command, we'll focus on the mechanics of the history command instead of fc for most of this article.
In addition to these two bulitin commands, there are a variety of files (like ~/.bash_history), expansions (like !!), and keyboard shortcuts (like the ↑ and ↓ keys) that help you work with bash history.
In the sections below, we'll explore how these aspects of bash history work.
#Where is Bash history stored?
By default, history stores commands in RAM until you log out of the terminal. Once you log out, commands are written to disk in the ~/.bash_history file. The history buffer is limited to 1,000 command entries and the history file is limited to 2,000 entries.
You can modify the default behavior of the history command by setting environment variables, which we'll review in more detail shortly.
#Working with Bash history: the basics
Bash history is a feature that allows you to view and clear previously executed commands. Below, we’ll go through how to see bash history, how to clear bash history, as well as how to search through the bash history.
#How to see Bash history?
The easiest way to get started working with bash is to run the history command with no options. You should see output similar to this:
history
1  echo "one"
2  echo "two"
3  echo "three"
4  echo "four"
5  echo "five"
6  echo "six"
The numbers next to the commands indicate the order they were entered into the history (the oldest command being 1). You can also use the ↑ and ↓ keys on your keyboard to scroll through your bash history.
We can limit the output to the last N commands with the command history N. For example, history 2 will return the 2 most recent commands.
history 2
6  echo "six"
7  history 2
You can pipe history into grep or less to make it easier to filter the output.
history | grep ping
6  ping cherryservers.com
27  history | grep ping
#How to clear Bash history?
To clear Bash history, you can delete a specific entry with the history -d N where N is the number of the command or a range of numbers. For example, history -d 2-4 deletes commands 2, 3, and 4 from our history.
To clear the history buffer (i.e., the commands saved in RAM for the current terminal session) use the command history -c.
The bash history saved to disk is in the $HISTFILE which is ~/.bash_historyby default. You can clear that file with a command such as:
cat /dev/null > ~/.bash_history
#Configuring Bash history settings with .bashrc
In some cases, you may want to modify how bash history works on your Linux system. Adding Linux environment variables to your ~/.bashrc file can help you do just that. Here are some common use cases for customizing bash history using ~/.bashrc.
As we go, remember that changes to a user's ~/.bashrc file take into effect after logging out and logging back into your shell. Alternatively, you may run . ~/.bashrc or source ~/.bashrc to reload bash settings.
#Exclude commands from Bash history
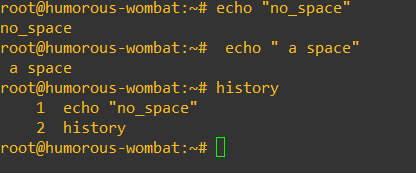
You may want to exclude commands from bash history to avoid noise in the output or for security reasons. On many Linux distros, you can prevent a command from being included in bash history by adding a space before you execute the command.
However, that may not hold true on all distros. Whether or not leading spaces are ignored depends on the$HISTCONTROL environment variable. If $HISTCONTROL is set to ignoreboth or ignorespace, commands with a leading space are not saved to history.
To exclude commands from your bash history with ~/.bashrc, you can use the $HISTIGNORE environment variable. $HISTIGNORE allows you to define a colon separated list of command patterns that will not be saved to your bash history. For example, to ignore any sudo commands or any commands where echo is followed by a w, add this to your ~/.bashrc
HISTIGNORE='sudo *':'echo w*'
#Immediately persist commands to .bash_history
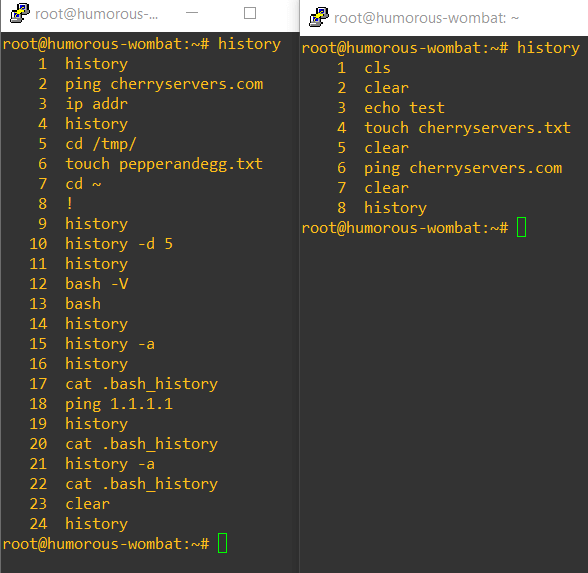
It's common for users to have multiple terminals open for the same user account, and this is where things can get tricky. By default, the history command will only show commands from the current terminal session and the commands that are saved to the ~/.bash_history file are the commands from the last session to log out.
To immediately persist commands to your ~/.bash_history file, you can add this to ~/.bashrc:
PROMPT_COMMAND='history -a'
#Bash history with timestamp: add date and timestamps to Bash history output
Often, knowing when you ran a command is an important part of knowing which command you need now. Adding timestamps to your bash history output can help make this easier.
To include timestamps with your bash history, add this to your ~/.bashrc:
HISTTIMEFORMAT="%F %T "
%F adds the date in YYYY-MM-DD format and %T adds a HH:MM:SS timestamp. Here is an example of what history command output looks like with this bash environment variable set.
Note that the space after the %F and %T is useful for formatting the output. Without the spacing, the date, timestamp, and command would all run together.
#Modify Bash history buffer and file size
If the default values of 1,000 command entries in the history buffer and 2,000 entries in the history file isn't what you want, you can change the $HISTSIZE (buffer) and $HISTFILESIZE (file) environment variables.
For example, to set both to 11,000 entries, modify the default values to read:
HISTSIZE=11000
HISTFILESIZE=11000
#Search Bash history: keyboard shortcuts
In addition to the history command, there are several keyboard shortcuts that make working with bash history easy. Here are some of the most useful:
| Bash history keyboard shortcut | Description |
|---|---|
| ↑ key | Scroll backwards through bash history |
| ↓ key | Scroll forward through bash history |
| ctrl+R | Search for commands in your bash history |
| ctrl+O | Run a command you found using a ctrl+R search |
| ctrl+G | Exit a crtl+R search |
#Bash history expansion
If you've ever run sudo !!, you've already used a bash history expansion command. However, there are plenty of other ways to use expansion commands to work with your bash history. Here is a list of some of the most useful bash history expansions:
| Bash history expansion command | Description |
|---|---|
!! |
The last command executed in the terminal. This is equivalent to !-1. |
!N |
The Nth command in your bash command history. |
!-N |
The command N before the most recent command in your bash history. |
Here's a simple example to demonstrate the logic:
Note that in the example we added a space before our expansion commands so they aren't included in our bash history.
#Bash history designators
All three of the previous expansion commands are examples of designators. And there are several more powerful designators you can use to work with your bash history.
!<command> will execute the most recent <command> in your bash history. For example, suppose we have these commands in our history output:
1  ping 1.1.2.2
2  touch pepperandegg.txt
3  curl -Lo cherry.html cherryservers.com
4  rm somefile.log
5  ls -la
!curl will run curl -Lo cherry.html cherryservers.com, !ls will run ls -la, etc.
You can also use ^designators to substitute parts of the most recent command in your bash history with different content. The general format is:
^<original content>^<new content>^
For example, if the previous command in your history was:
scp this.file root@host:/path/wrongplace
And you wanted to change /path/wrongplace to /path/rightplace instead of typing the entire command again, you could run:
^wrongplace^rightplace^
And the output would be similar to:
scp this.file root@localhost:/tmp/rightplace

root@host's password:
this.file                             100%    10     0.0KB/s   00:01
#Use designators to get arguments from a command
You can use a colon : followed by a specific designator to add arguments from the most recent command in your history to a subsequent command. The table below details some of the common designators:
| Designator | Description |
|---|---|
!:^ |
Use the 1st argument of the most recent command in your bash history. |
!:N |
Use the Nth argument of the most recent command in your bash history |
!:$ |
Use the last argument of the most recent command in your bash history. |
!:* |
Use all the arguments of the most recent command in your bash history. |
Below is an example to visualize the concept:
#Bash history modifiers
Bash history modifiers complement designators by changing the content or execution of the command. You specify modifiers after a command with a colon and a letter (e.g., :h )
Here are some common bash history modifiers and what they do.
| Modifier | Description |
|---|---|
:h |
Removes the trailing path from a command. Useful for getting a path without a filename. |
:t |
Removes the leading path from a command. Useful for getting a filename without a path |
:r |
Removes an extension from a filename. |
:p |
Prints a command without running it. |
:s |
Enables string substitution comparable to the sed command. |
For example, suppose we wanted to list all the .log files in a directory with ls /directory/*.log but instead we ran the command ls /directory/*.txt. We could use the command !:s/txt/log to correct the mistake. End-to-end, it would look similar to this:
ls /directory/*.txt
pepperAndEgg.txt

!:s/txt/log
ls /directory/*.log
log1.log  log2.log  log3.log
#Conclusion
With knowledge of bash history commands, you can work more efficiently at a Linux terminal. The information we covered here should help you handle most of the common bash history use cases you'll encounter. For a deeper dive on bash history, we recommend reading the GNU man page for the bulitin bash history commands and testing different designators and customizations in your own test environment.
For further reading, check our other Linux administration tutorials,, or subscribe to the Cherry Servers blog!
Cloud VPS Hosting
Starting at just $3.24 / month, get virtual servers with top-tier performance.


